|
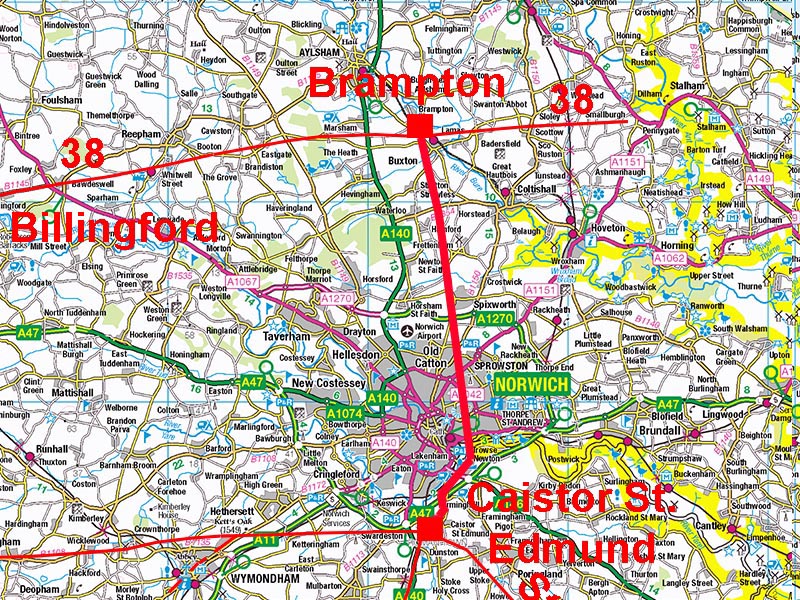
The Roman Road from Brampton to Caistor St EdmundMargary Number: noneDistance: 13 milesBrampton was the Roman equivalent of the Potteries with around 130 kilns currently known there so communications to and from it would have been essential. The accepted and widely published route of the road south from Brampton was to Thorpe St. Andrew, a small settlement of the eastern side of Norwich. I had long been suspicious of this as surely the primary market for the goods from the potteries would have been the Roman walled city of Venta Icenorum. Venta after all means market-place. Sure enough this was found to be the case. NEW - see below for a 3D video flyover along this road. |
Historic Counties: Norfolk Current Counties: Norfolk HER: Norfolk
|
|
|
|

|
|
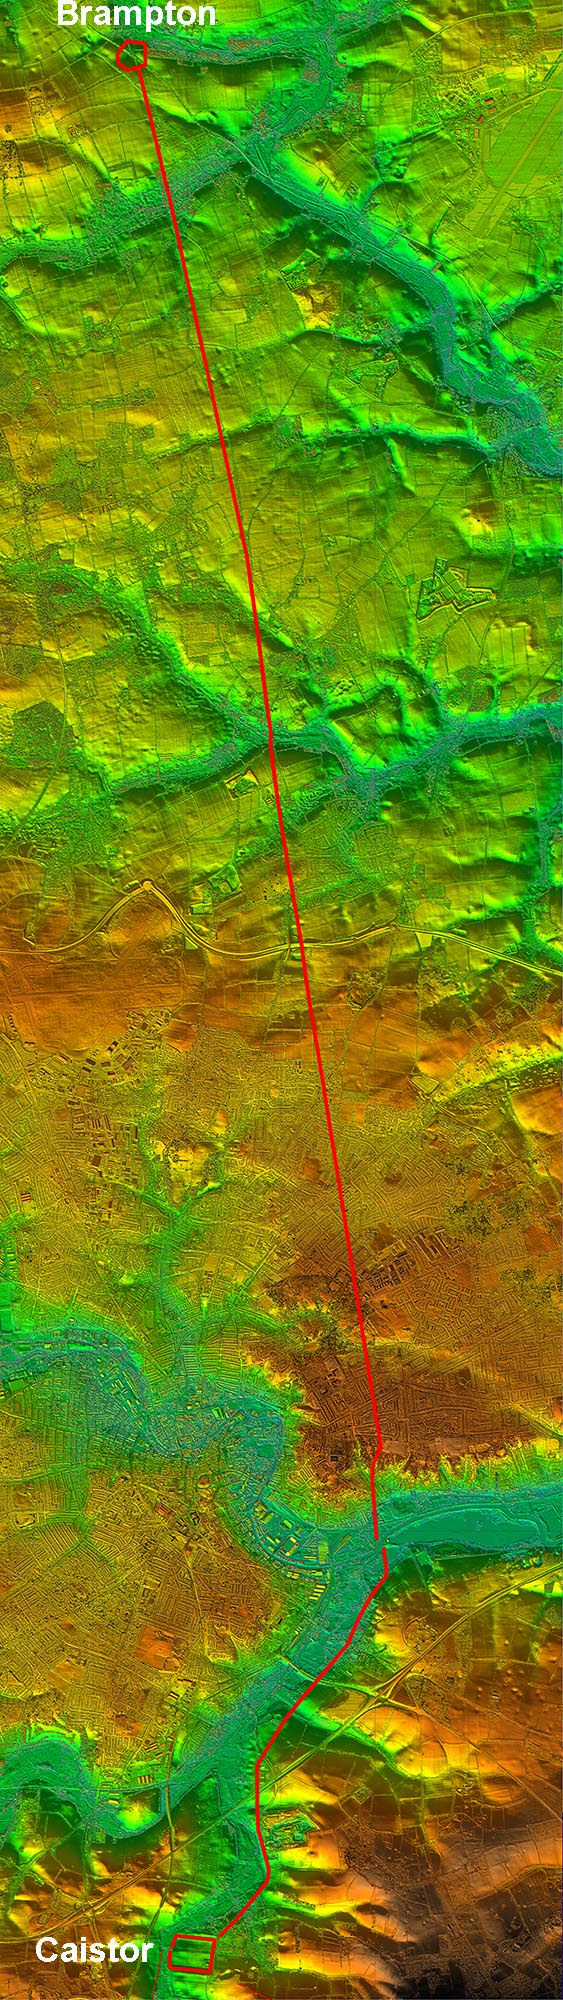
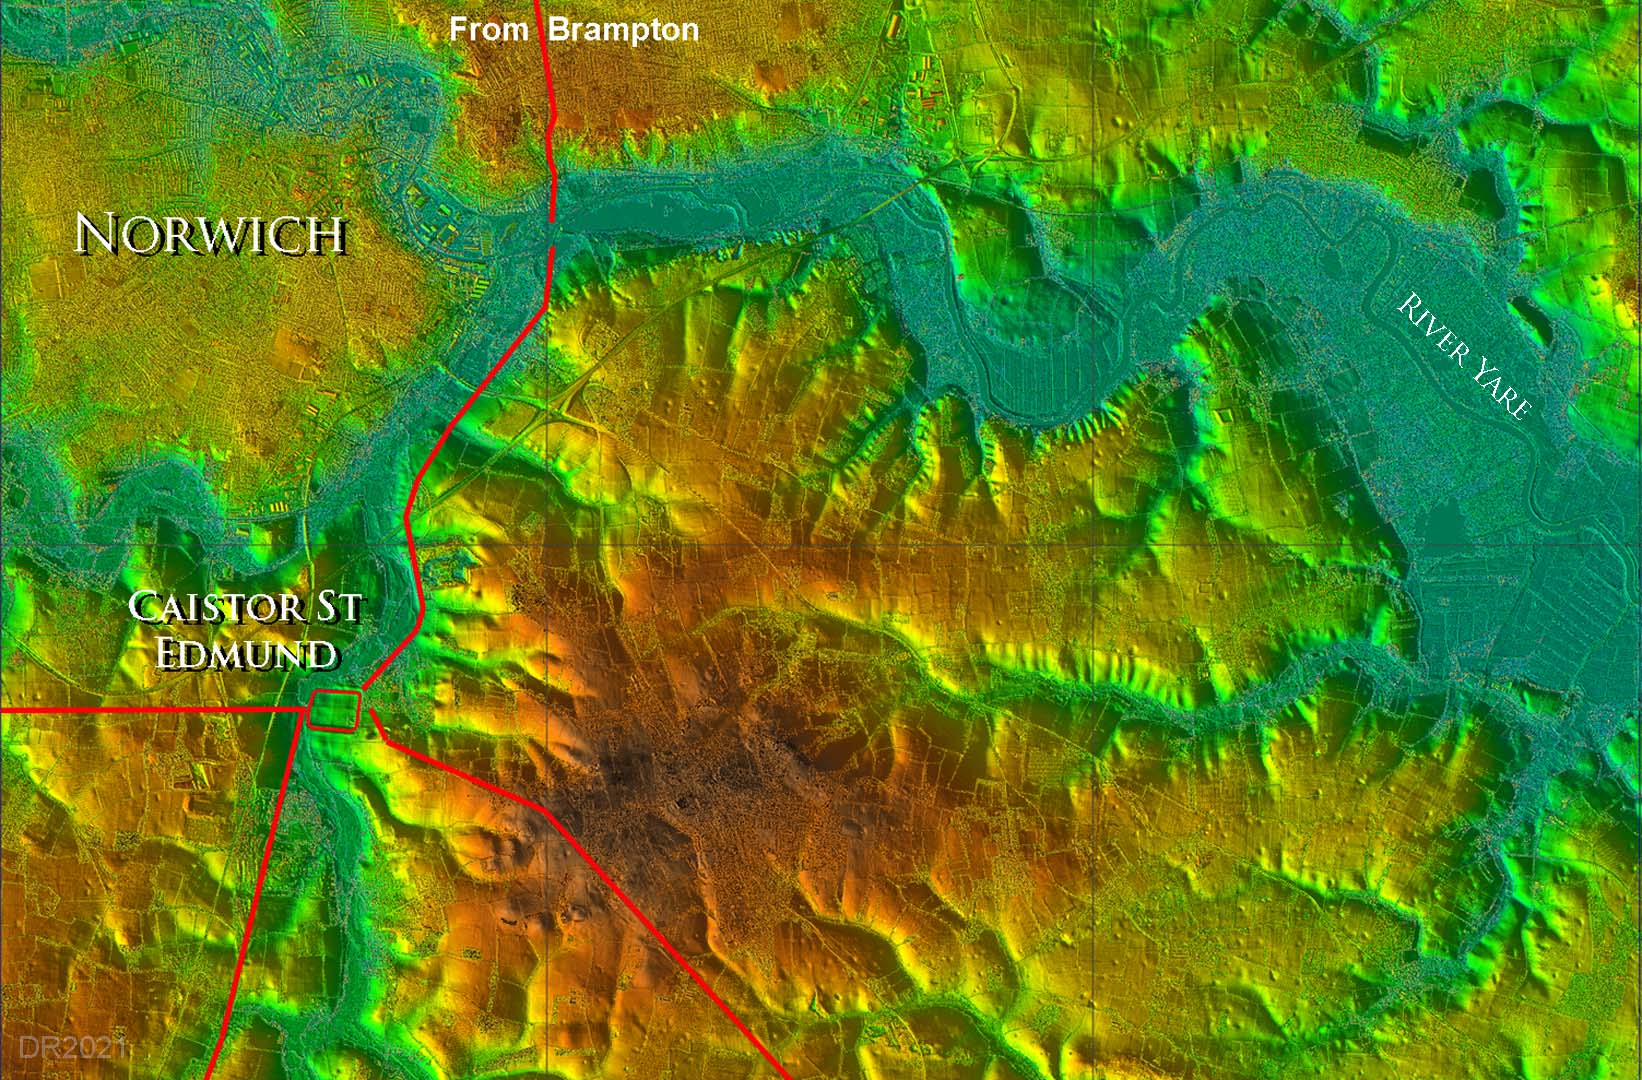
Lidar Image - Full Route It is clear why they chose the course they did. It is the most practical route between the two sites. It kept to high ground and involved only a single major river crossing. |
Click for larger view |
 |
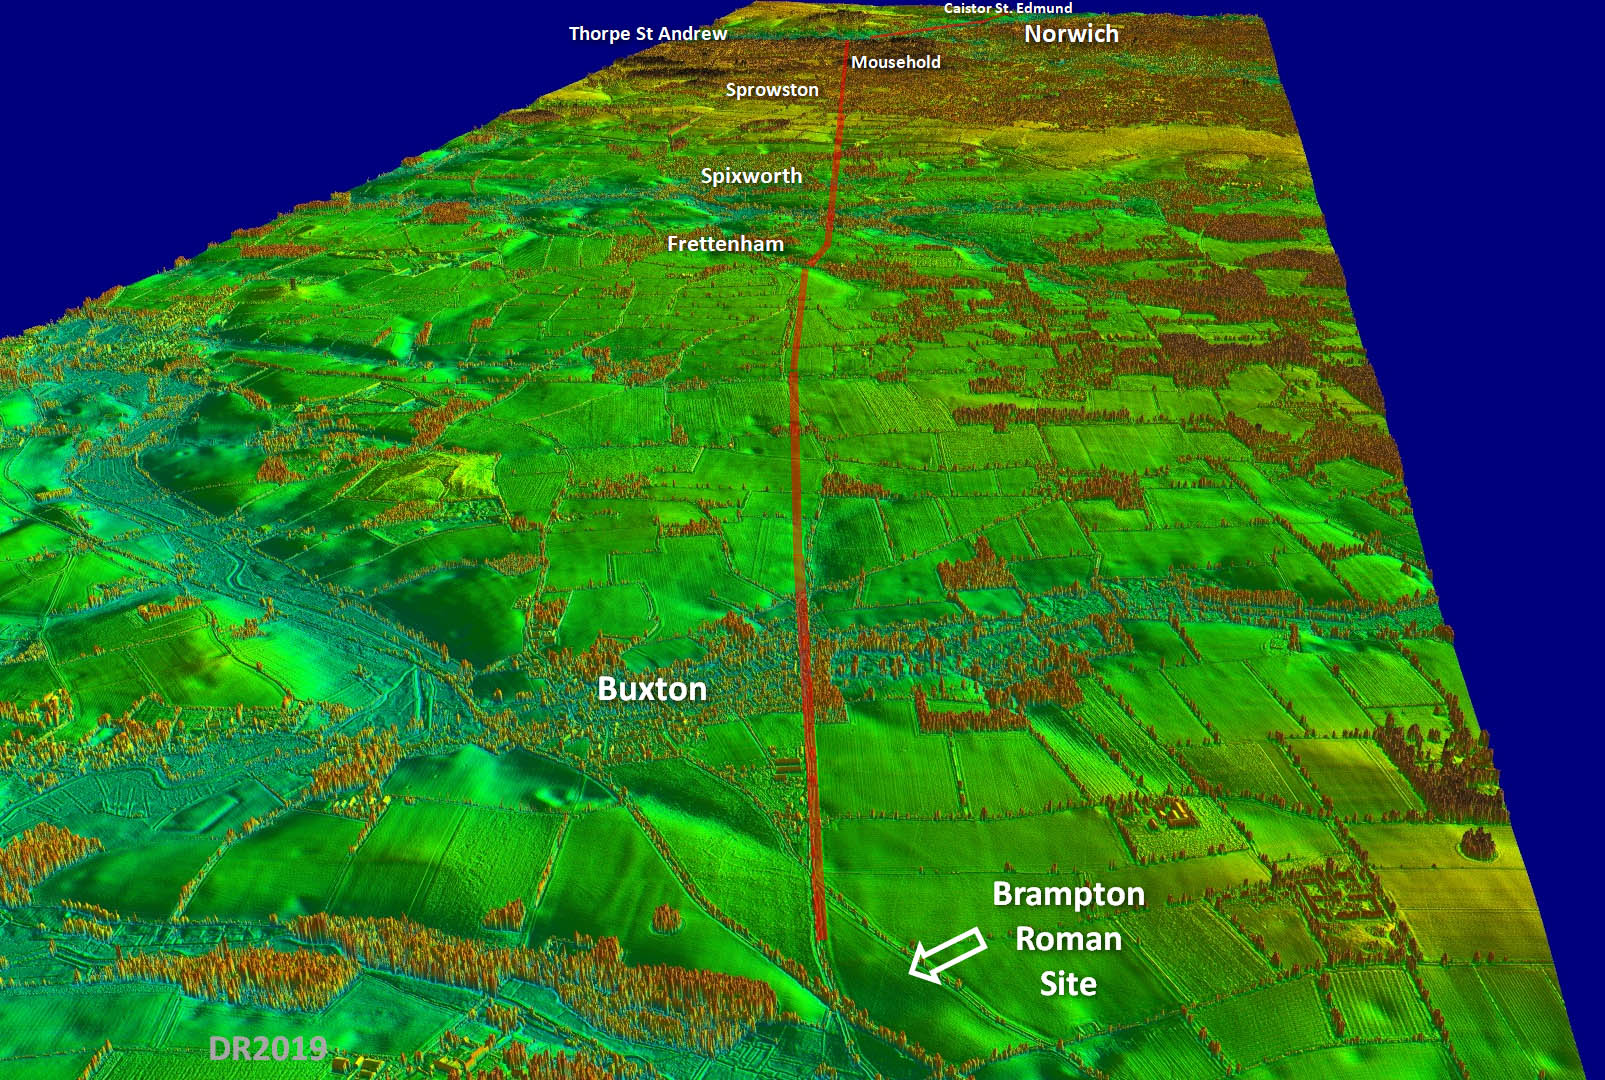
Oblique 3D Lidar View - looking south from Brampton In this 3D LiDAR view we are looking south down the line of the road. The previously believed course of the road was that it turned left at Frettenham and headed to Thorpe St Andrew - there is a long straight road there which no doubt led to the confusion. But now, thanks to Lidar, we now know the road carried straight on through Sprowston and Mousehold Heath. The correct route to Caistor is shown but I have labeled Thorpe St Andrew for reference.
|
Click for larger view
|
 |
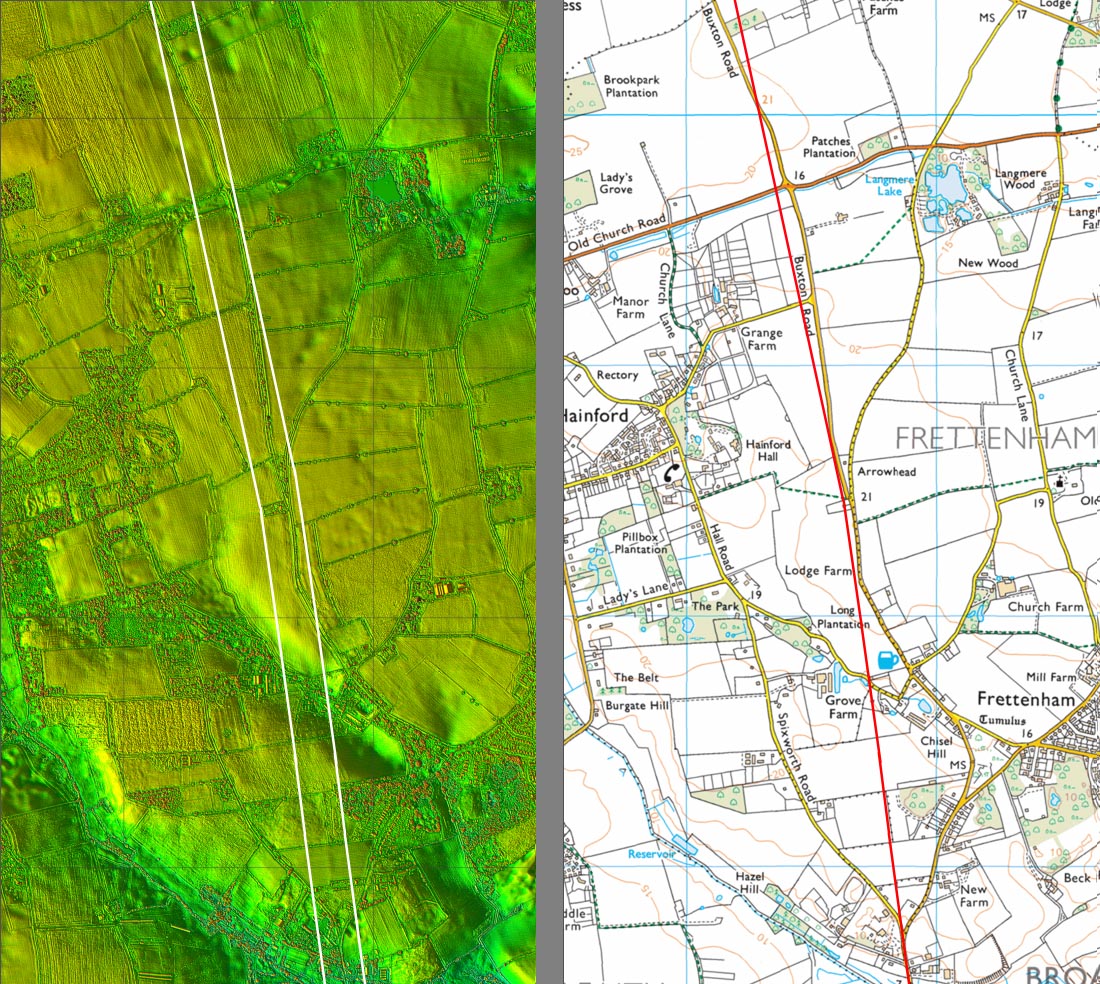
Lidar Image And Route Map 1 The modern road to Buxton is on or very close to the Roman line but south of Buxton then Lidar clearly shows the Roman route did not follow the modern road as previously believed. |
Click for larger view |
 |
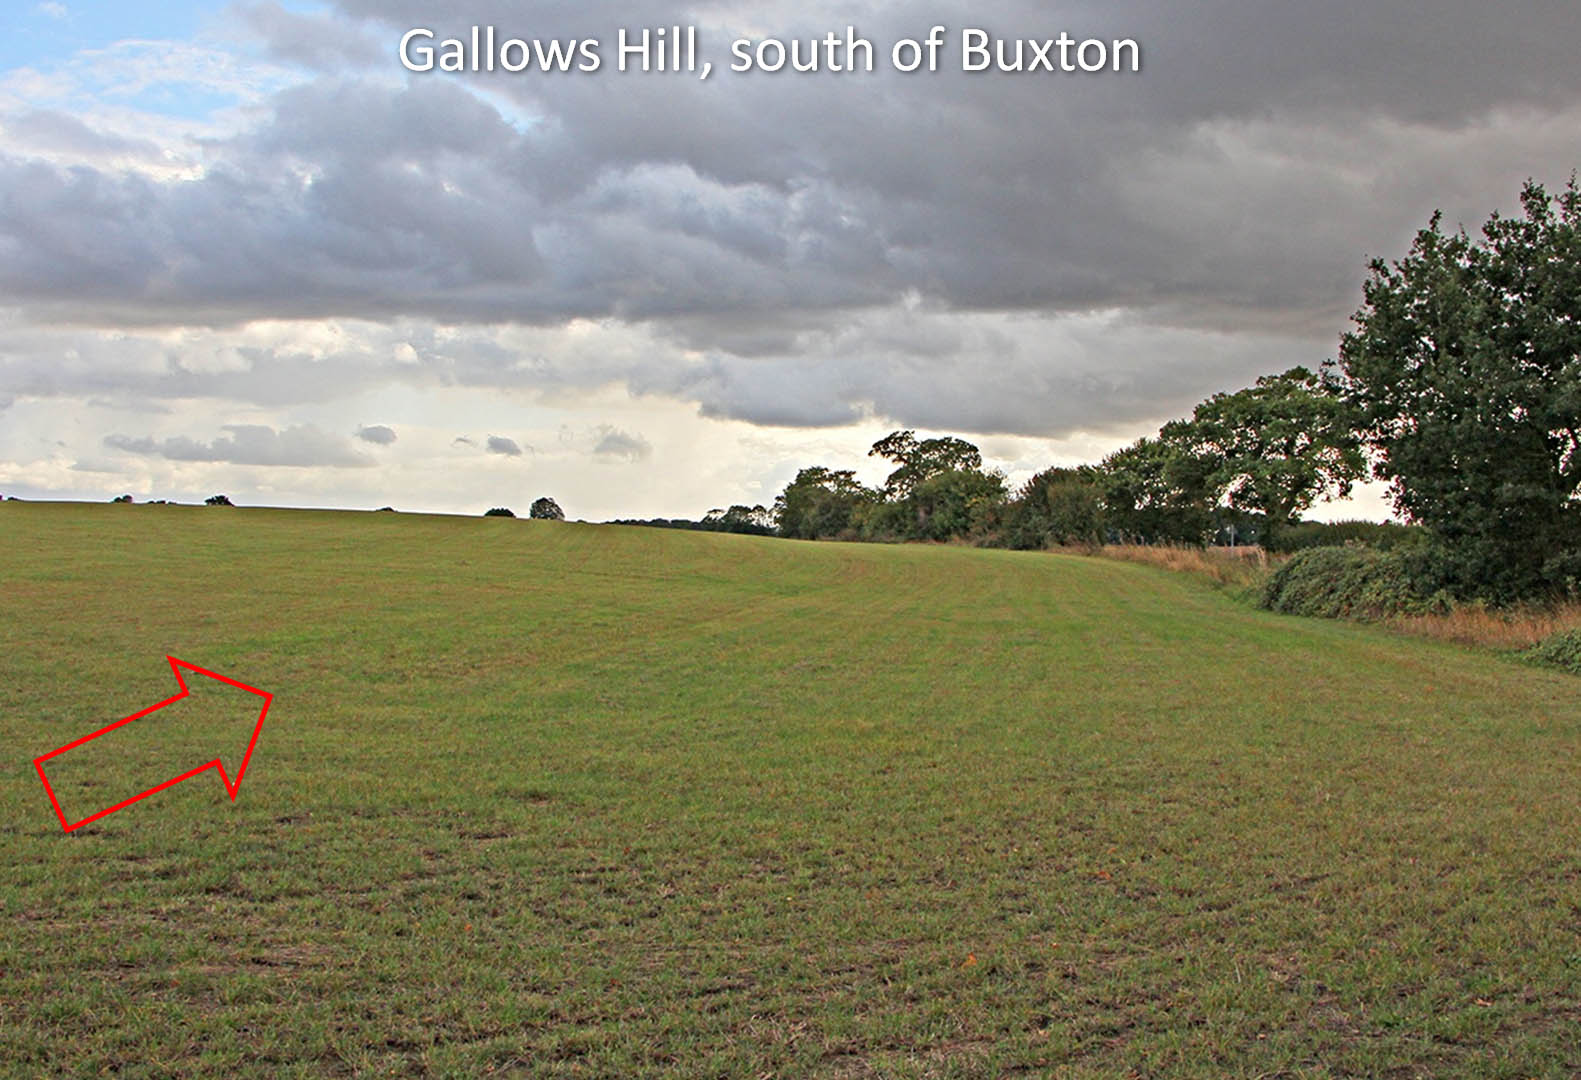
Gallows Hill - looking south It was assumed (and was shown as such in the HER) that the modern road coincided with the Roman line as far as Frettenham. However, in reality south of Buxton the modern road is rarely on the Roman line. The correct Roman line is much straighter and lies in the fields either side of the modern road as it is here at Gallows Hill. Image DR |
Click for larger view |
 |
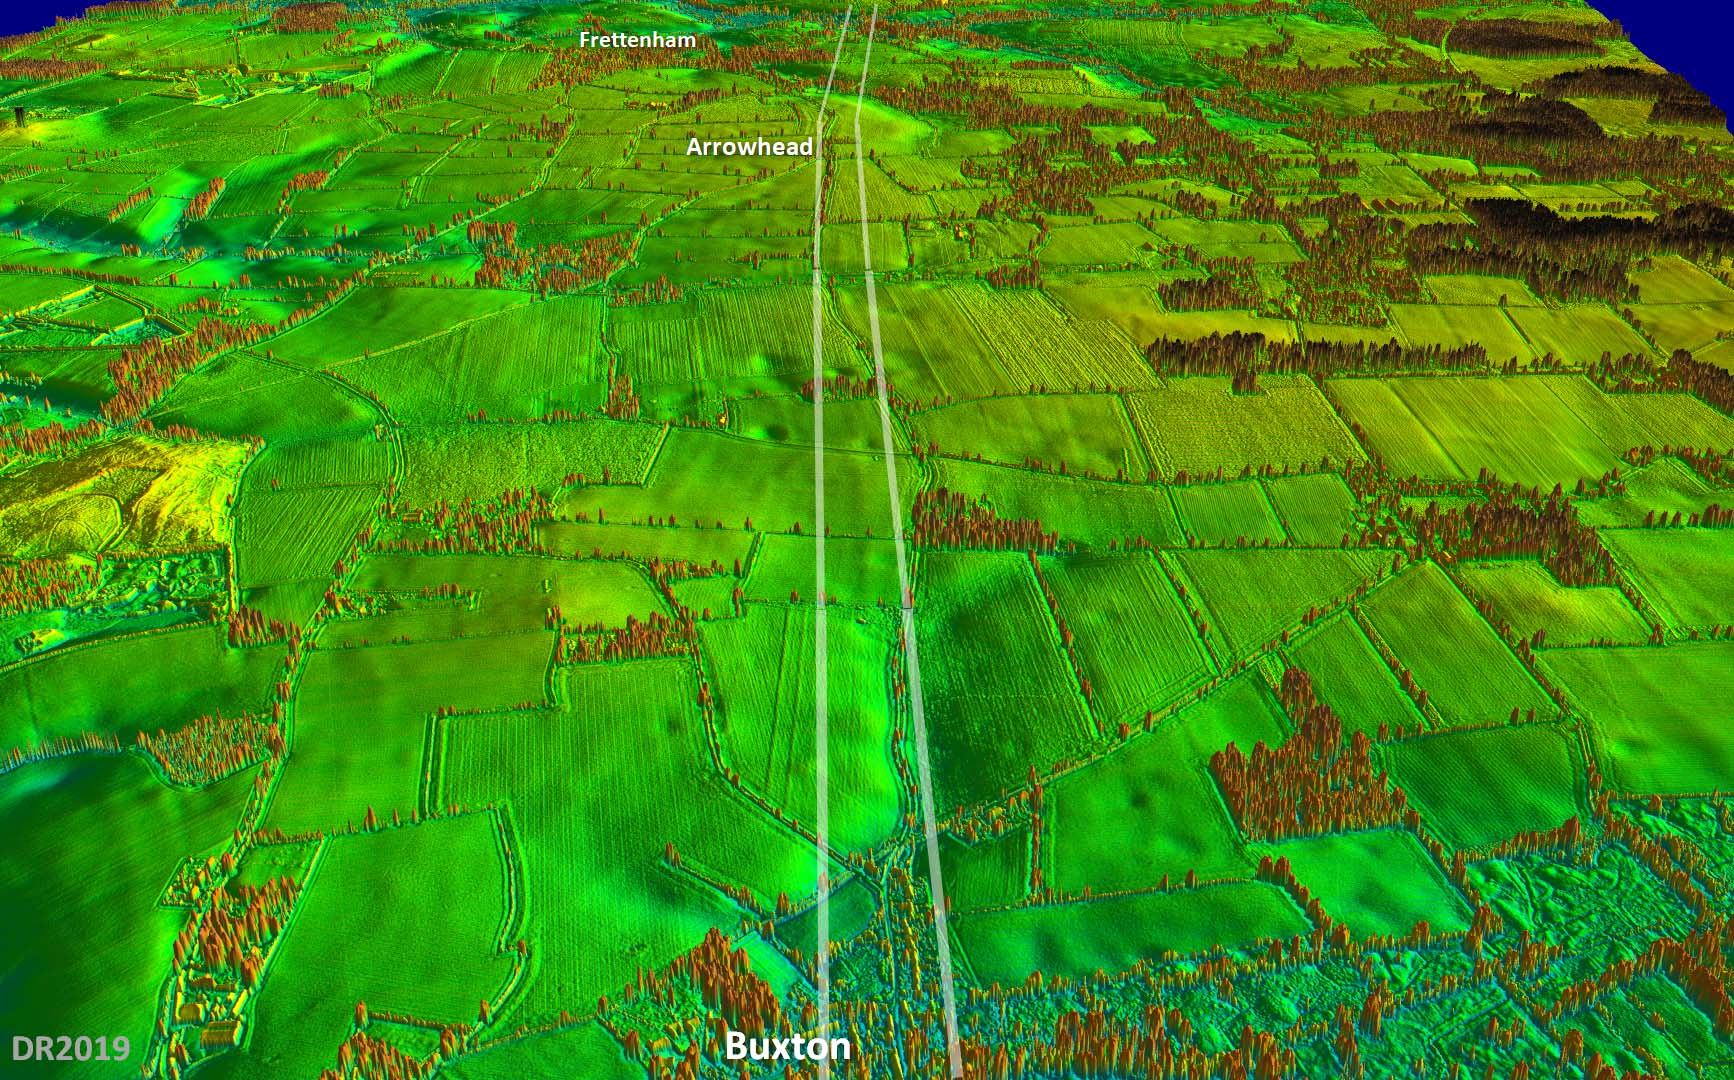
Oblique 3D Lidar View - looking south from Buxton This was the view that showed the Roman road did not follow the modern one but was much more direct. A straight alignment all the way to Arrowhead where there was a slight change of direction. |
 |
|
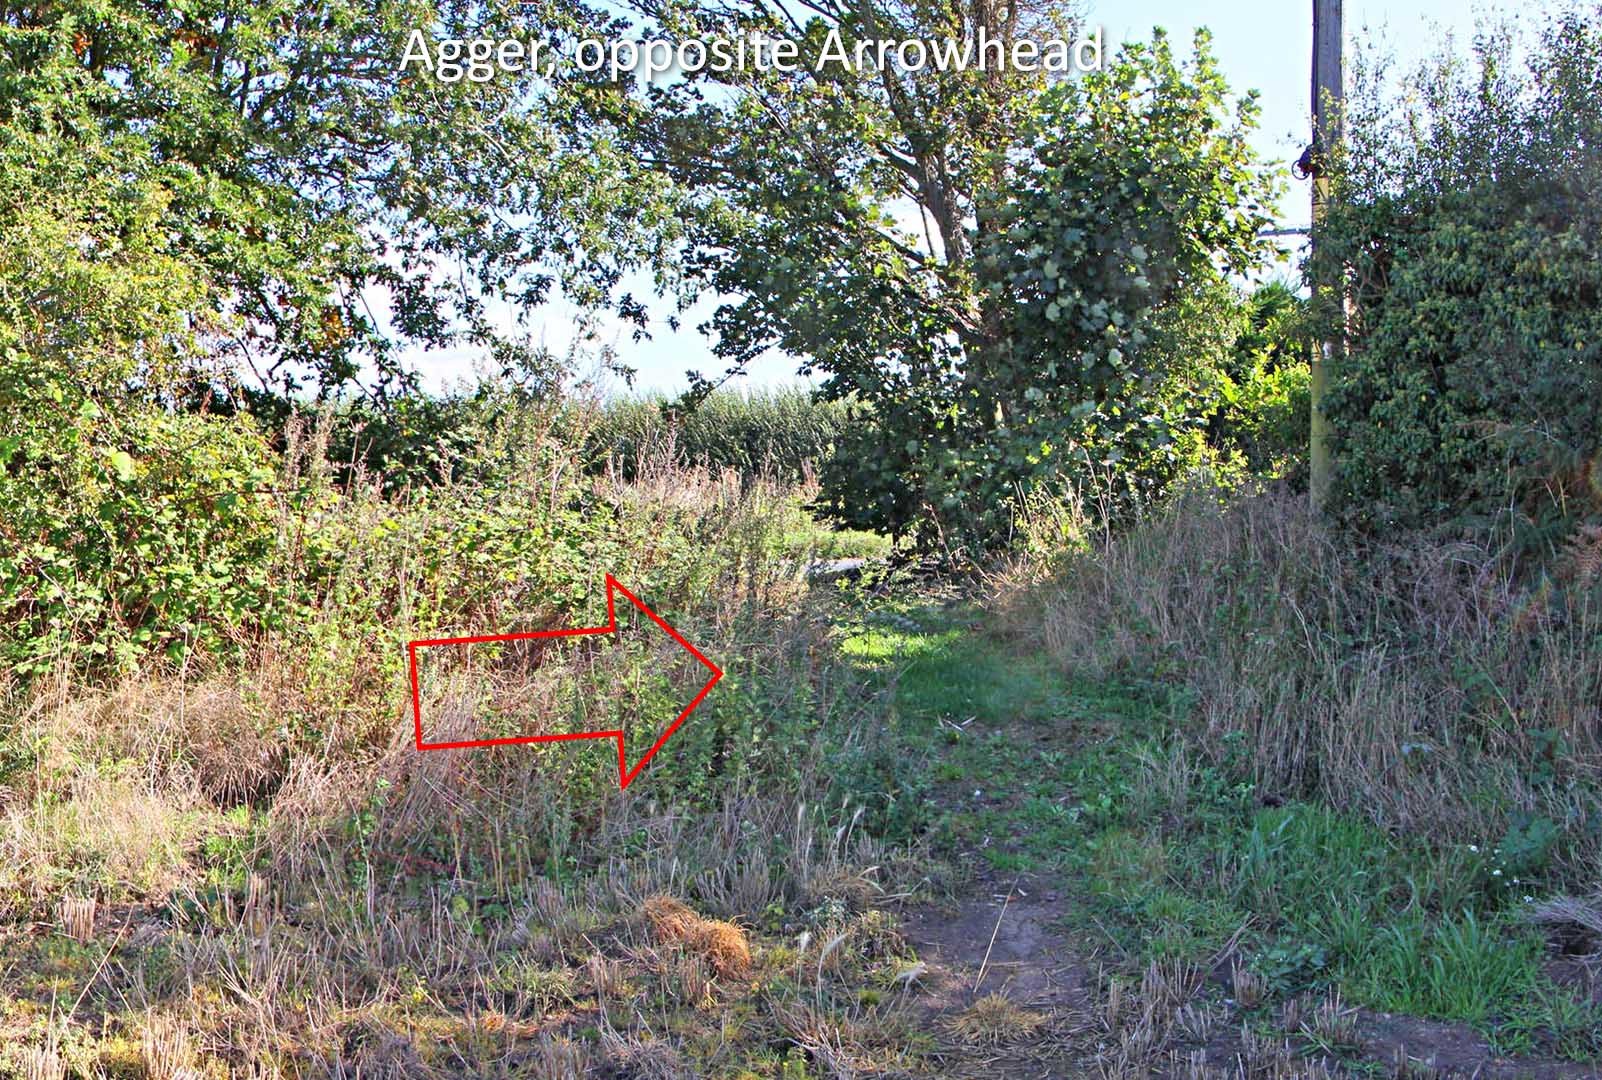
Agger at Arrowhead Just west of the modern road at Arrowhead is a public footpath. This goes up and over the remains of the Roman agger to get into the field. Image DR |
Click for larger view |
 |
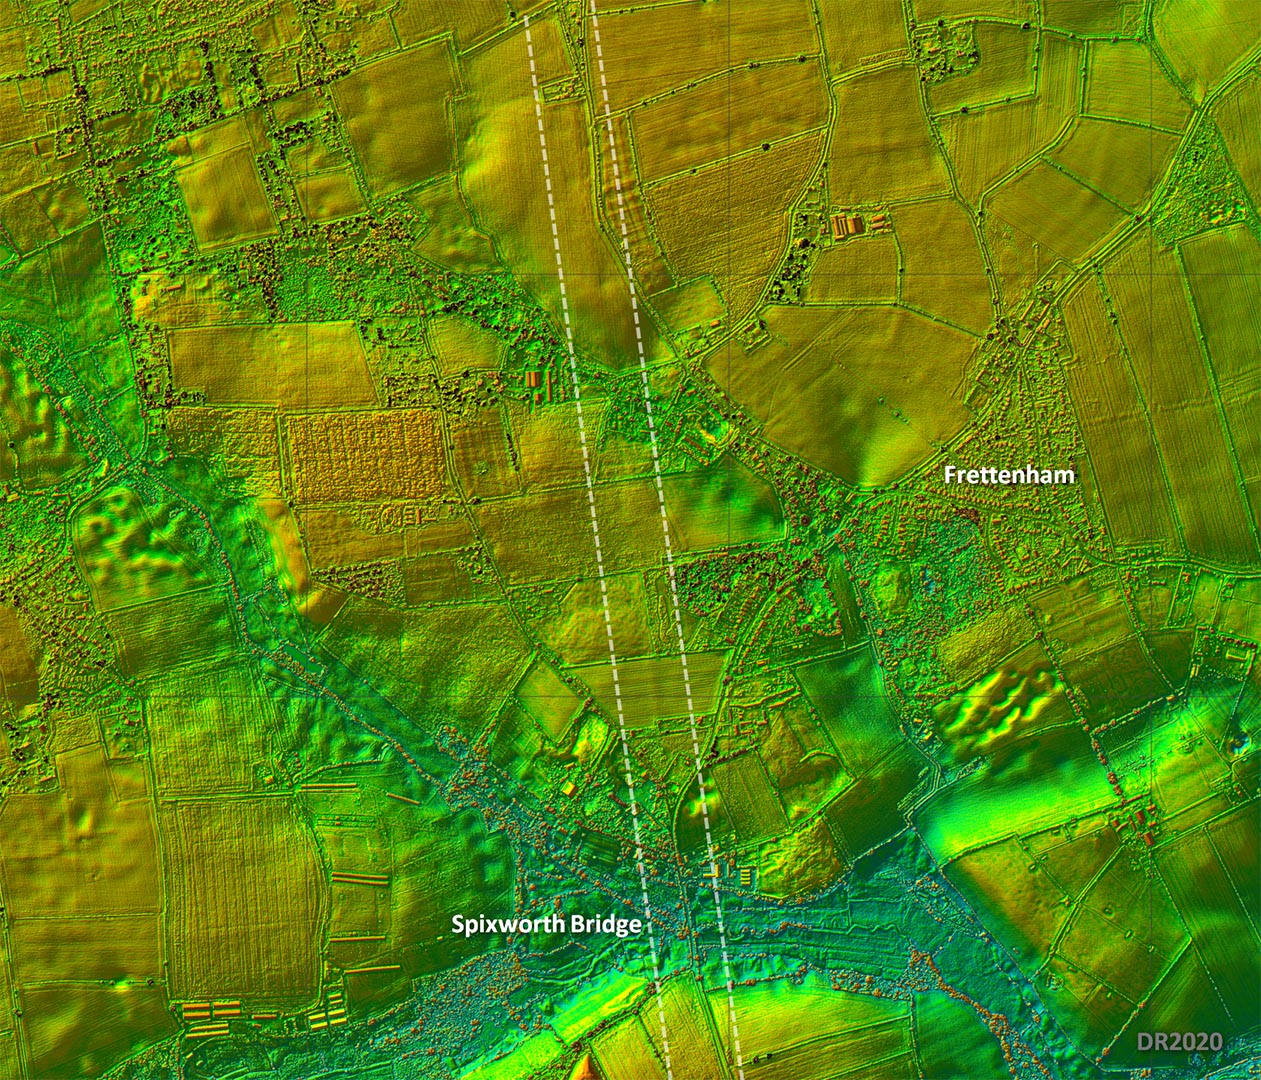
Lidar Image - Passing Frettenham Obvious and straight passing Frettenham aiming for Spixworth Bridge. |
Click for larger view |
 |
Lidar Image And Route Map 2 The change of direction at Arrowhead, although very small, was probably in order to get to the best crossing point of the stream at Spixworth Bridge. |
Click for larger view |
 |
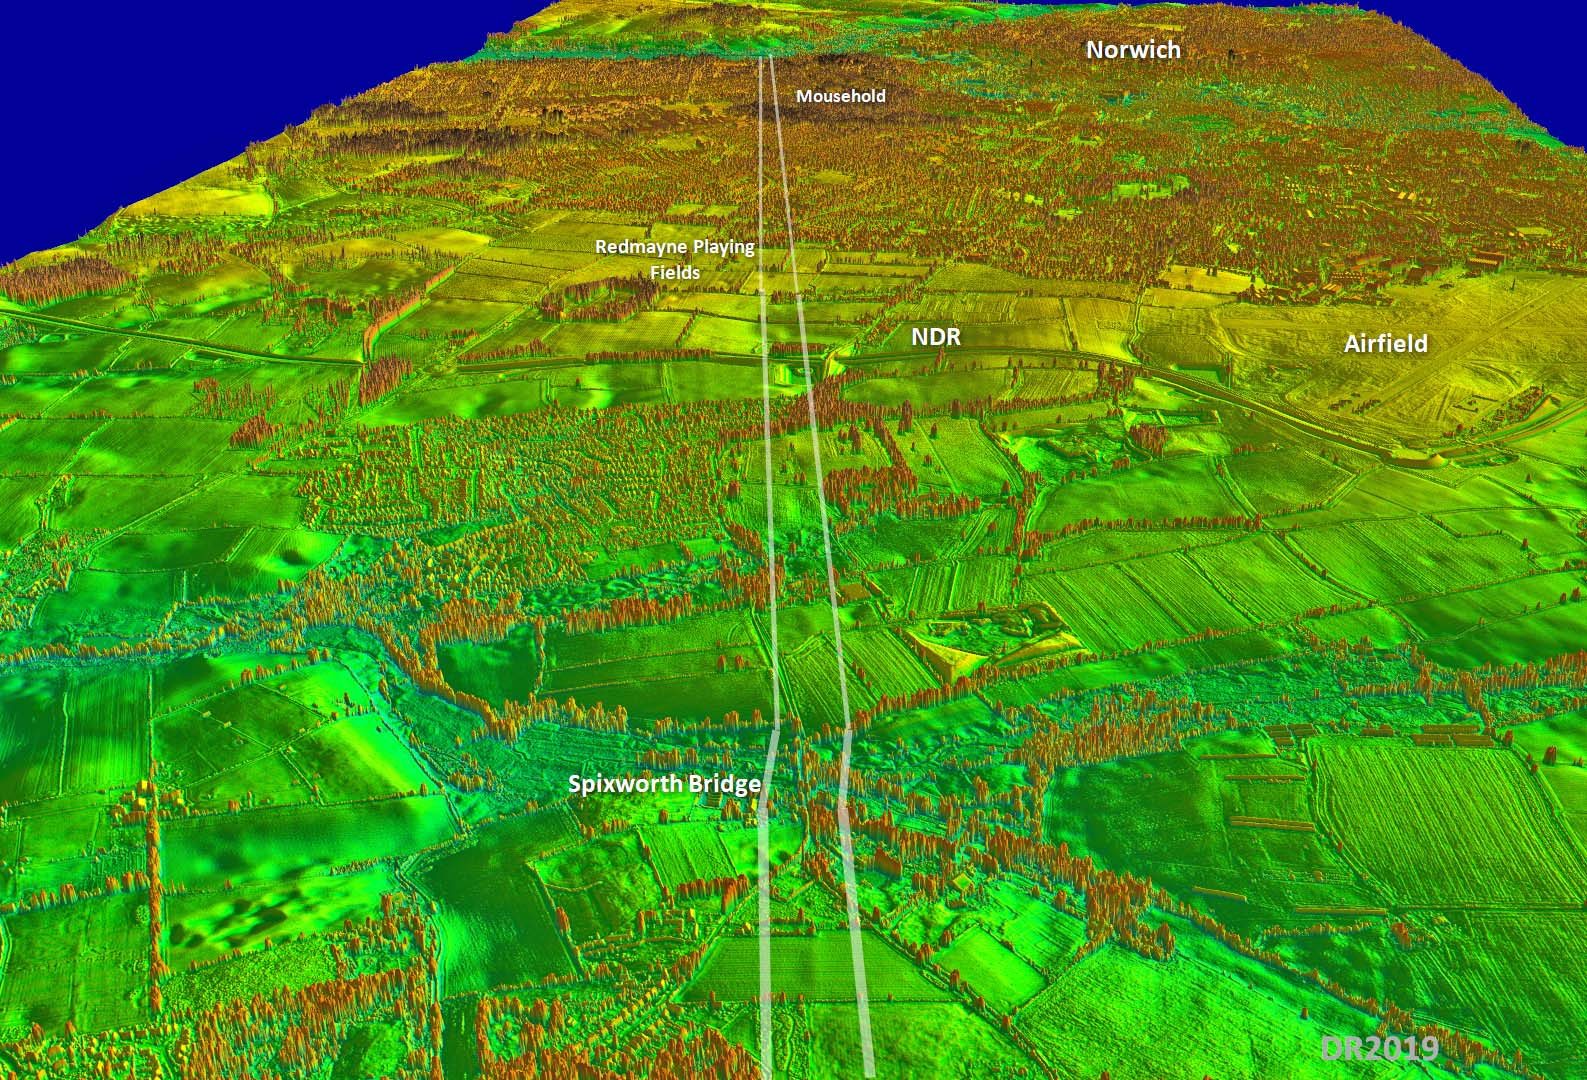
Oblique 3D Lidar View - looking south from Spixworth Bridge At Frettenham, the previously accepted wisdom (and again in the HER) was that the road dog-legged to the east for a course towards Thorpe St. Andrew. Several years ago I visited the suggested marsh crossing (HER 22951) on this route at Beck Farm (Frettenham) but it was way too narrow to be Roman. This was later confirmed when no LiDAR traces aligned with it. The Roman road didn’t go that way. Instead it carried straight on over Spixworth Bridge - well there was a bit of a dog-leg ascending the south bank.The route was easily spotted heading to Redmayne Playing Fields. In this 3D LiDAR view part of the evidence has been destroyed by the Northern Distributor Road (NDR) but is visible in the release 1 Lidar data. However, extrapolating the course onwards it was obvious where the road was aiming – a natural valley to descend down to a crossing of the River Yare but could I prove it? |
Click for larger view |
 |
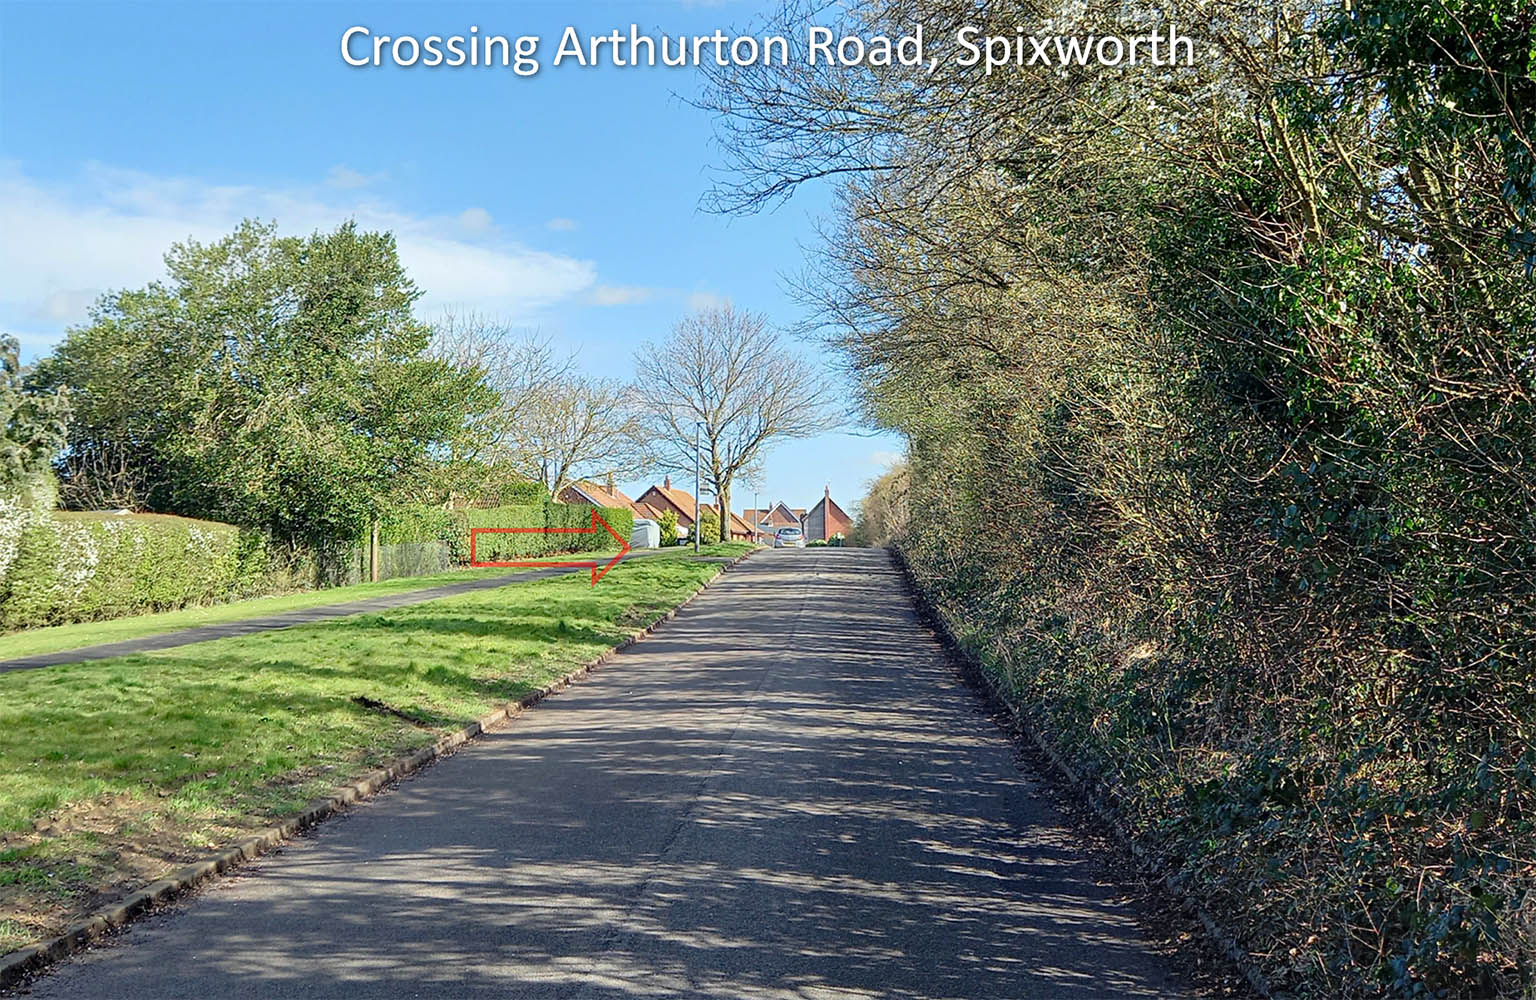
Crossing Arthurton Road, Spixworth On the southern edge of Spixworth our road crosses Arthurton Road. There is a noticeable hump in the modern road as it goes over the Roman agger - to the right of the arrow and tree. How many residents have driven up and down here without realising the significance of that bump in the road? Image: DR |
Click for larger view |
 |
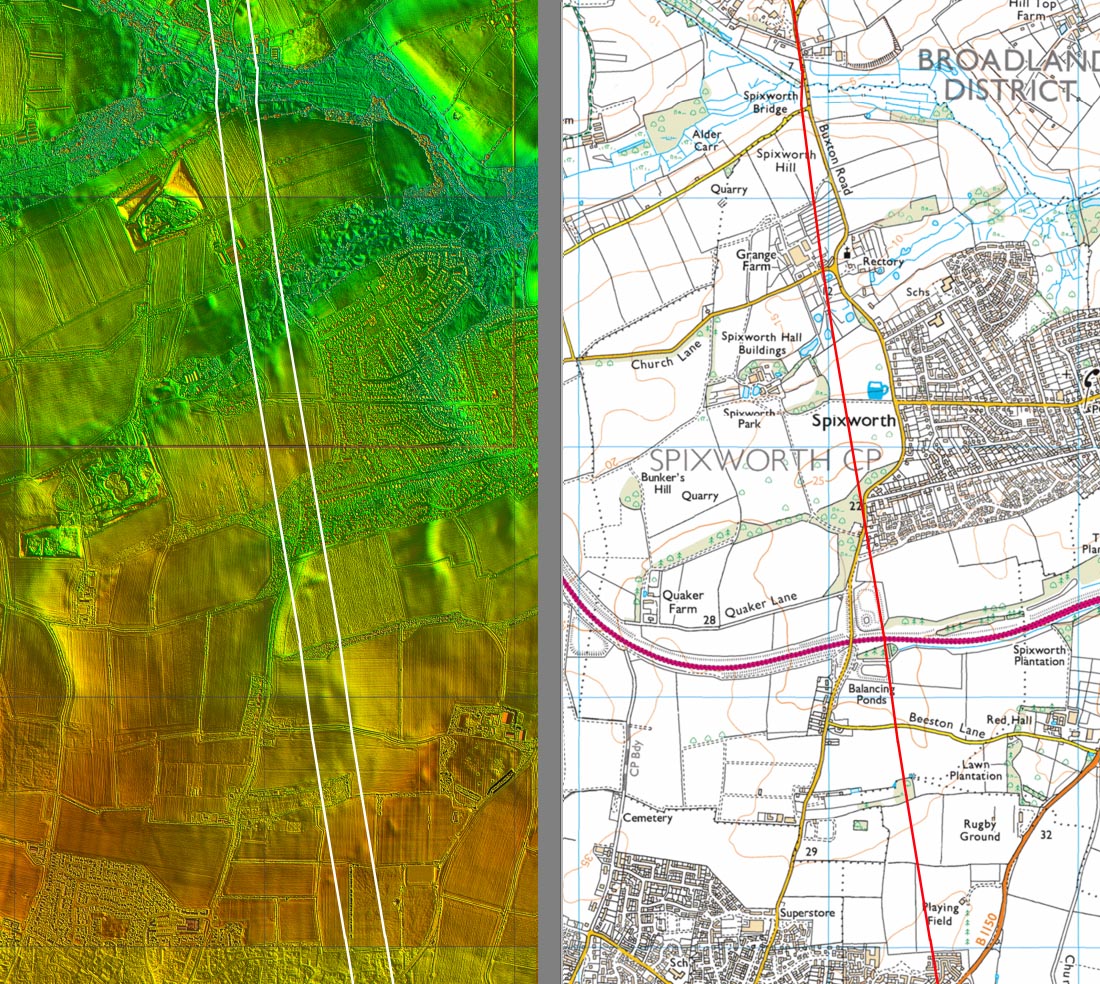
Lidar Image And Route Map 3 In this route-map the Lidar image is pre-NDR which destroyed a section of the Roman road. This stretch is also visible on a Google Earth aerial view. |
Click for larger view |
 |
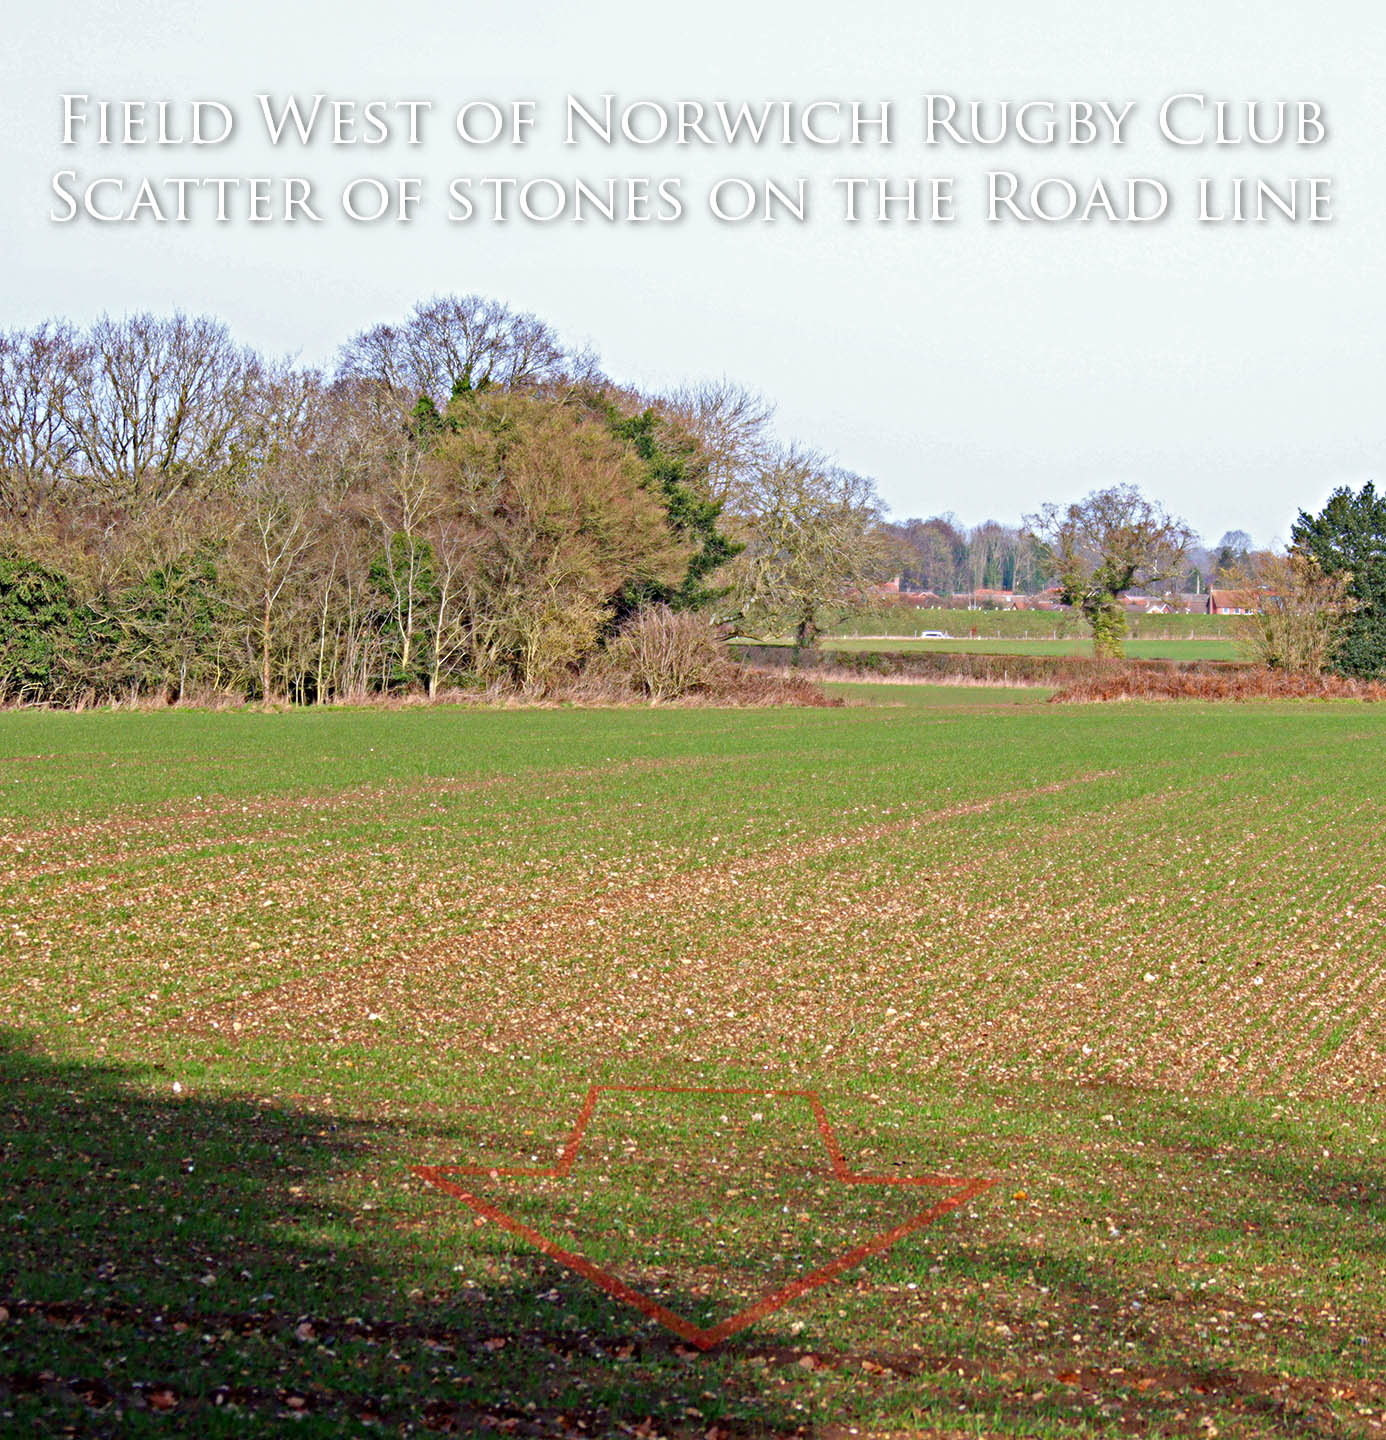
Stone Scatter in the field west of Norfolk Rugby Club The road has just about been ploughed away here but it has left a definite scatter of stones on the alignment. This is the field to the west of the rugby club looking back towards Spixworth. Redmayne playing fields are behind us. |
Click for larger view |
 |
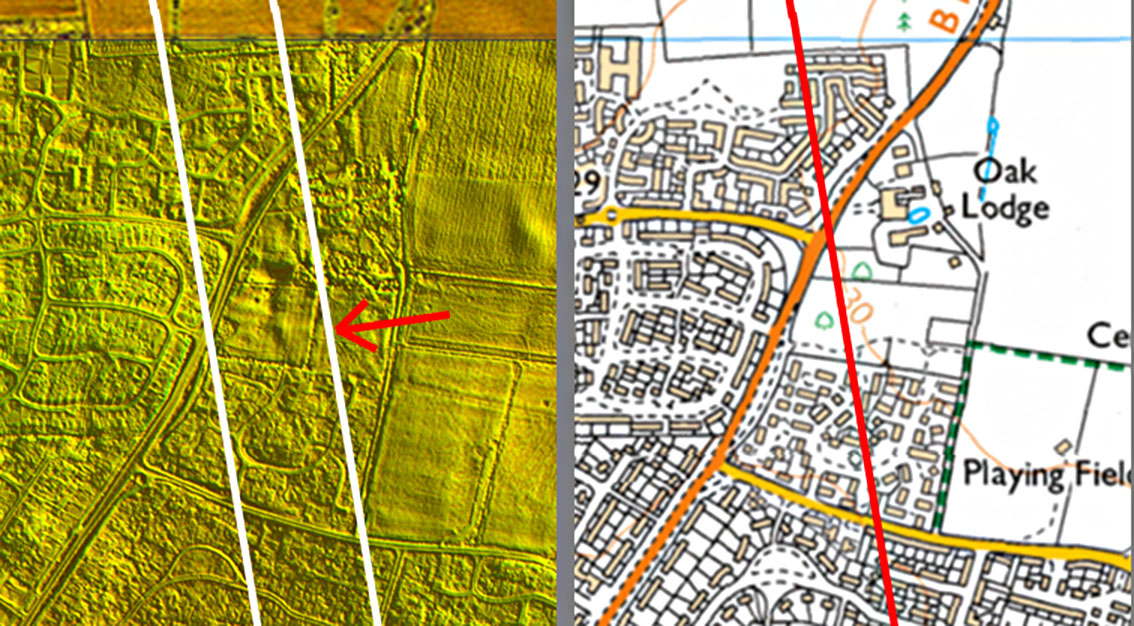
Oak Lodge Farm Just south of Oak Lodge, in a small park, then a short piece of the road may have survived. |
Click for larger view |
 |
Park south of Oak Lodge Farm - looking north There are perhaps a few humps and bumps of the road crossing the park south of Oak Lodge. The most noticeable on the ground is that at the far (north) side of the park. Image: DR |
Click for larger view |
 |
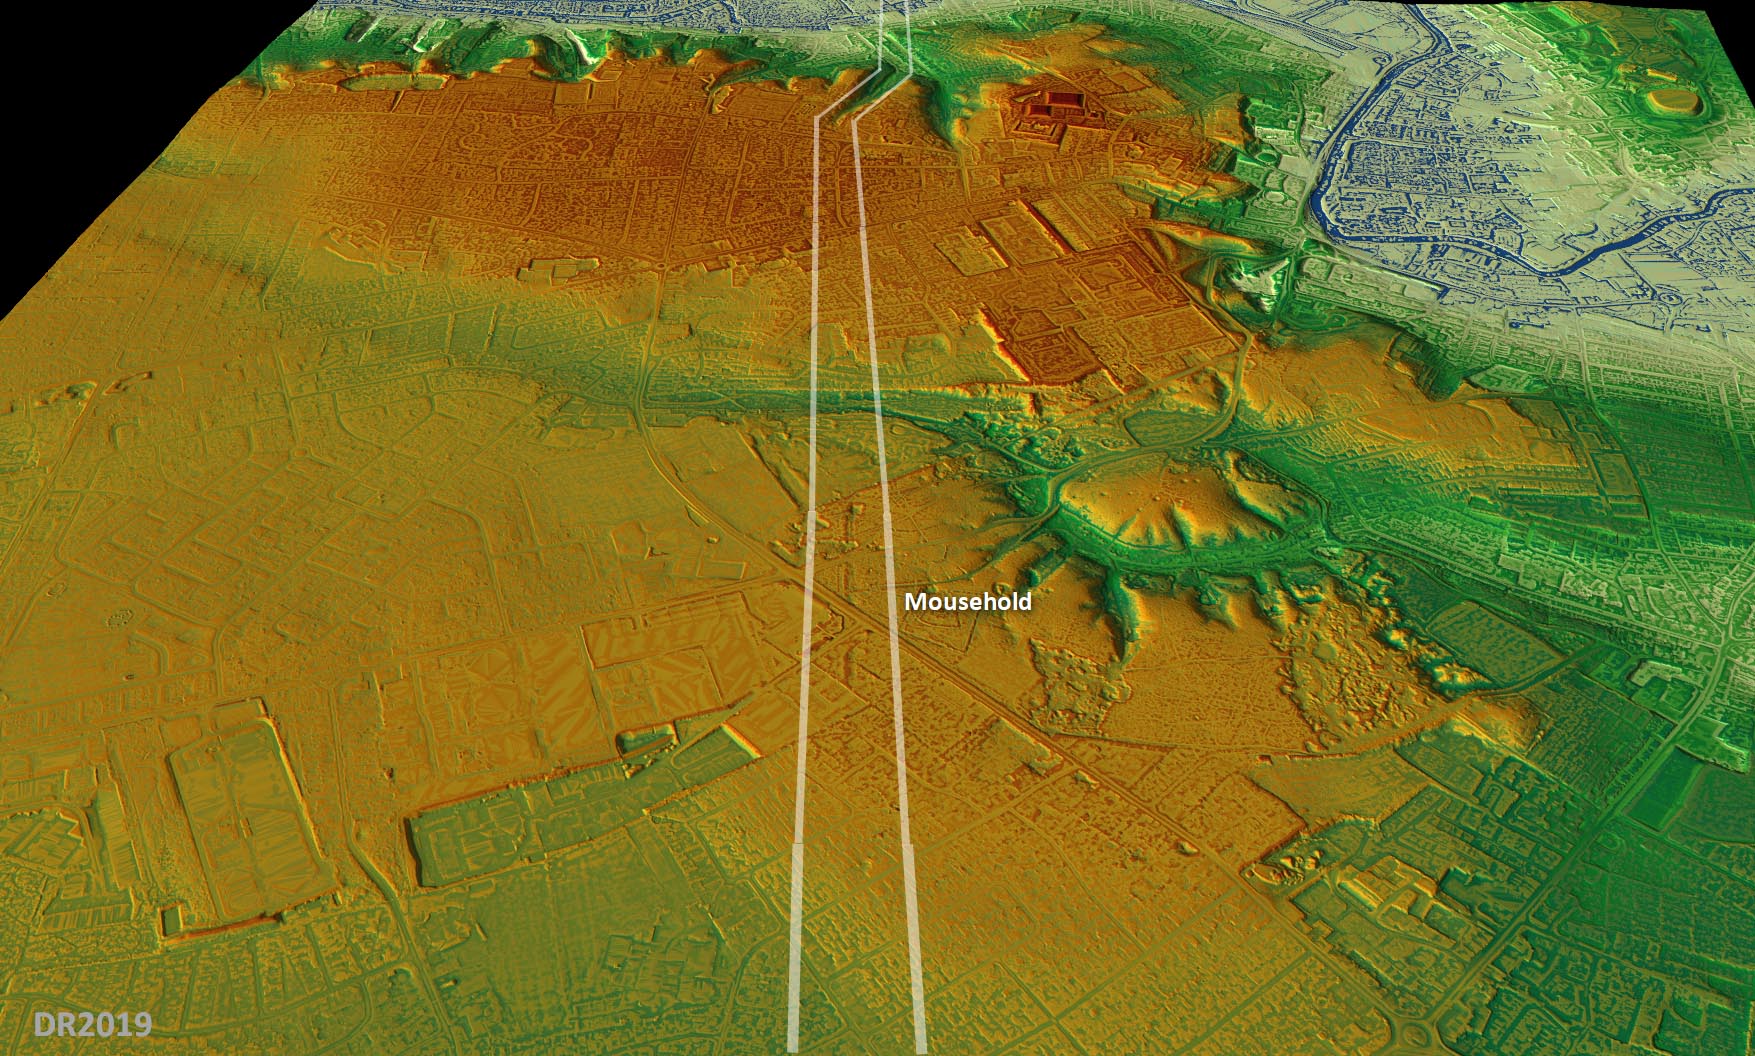
Oblique 3D Lidar View (DTM) - looking south over Mousehold I have never come across this before, the road was clearly visible across suburban Sprowston in the Lidar DTM model. The only assumption I could come to was that the good folk of Norwich don’t like digging in their back gardens and so traces of the agger are still there. Wow! Note: in the DTM data all buildings and shrubs/trees are removed leaving a rather unrealistic flat view of bare earth. Note also that Mousehold has a very strange and puzzling geological feature namely a circular valley around a higher centre dome. The Roman road wisely kept clear of this.. |
Click for larger view |
 |
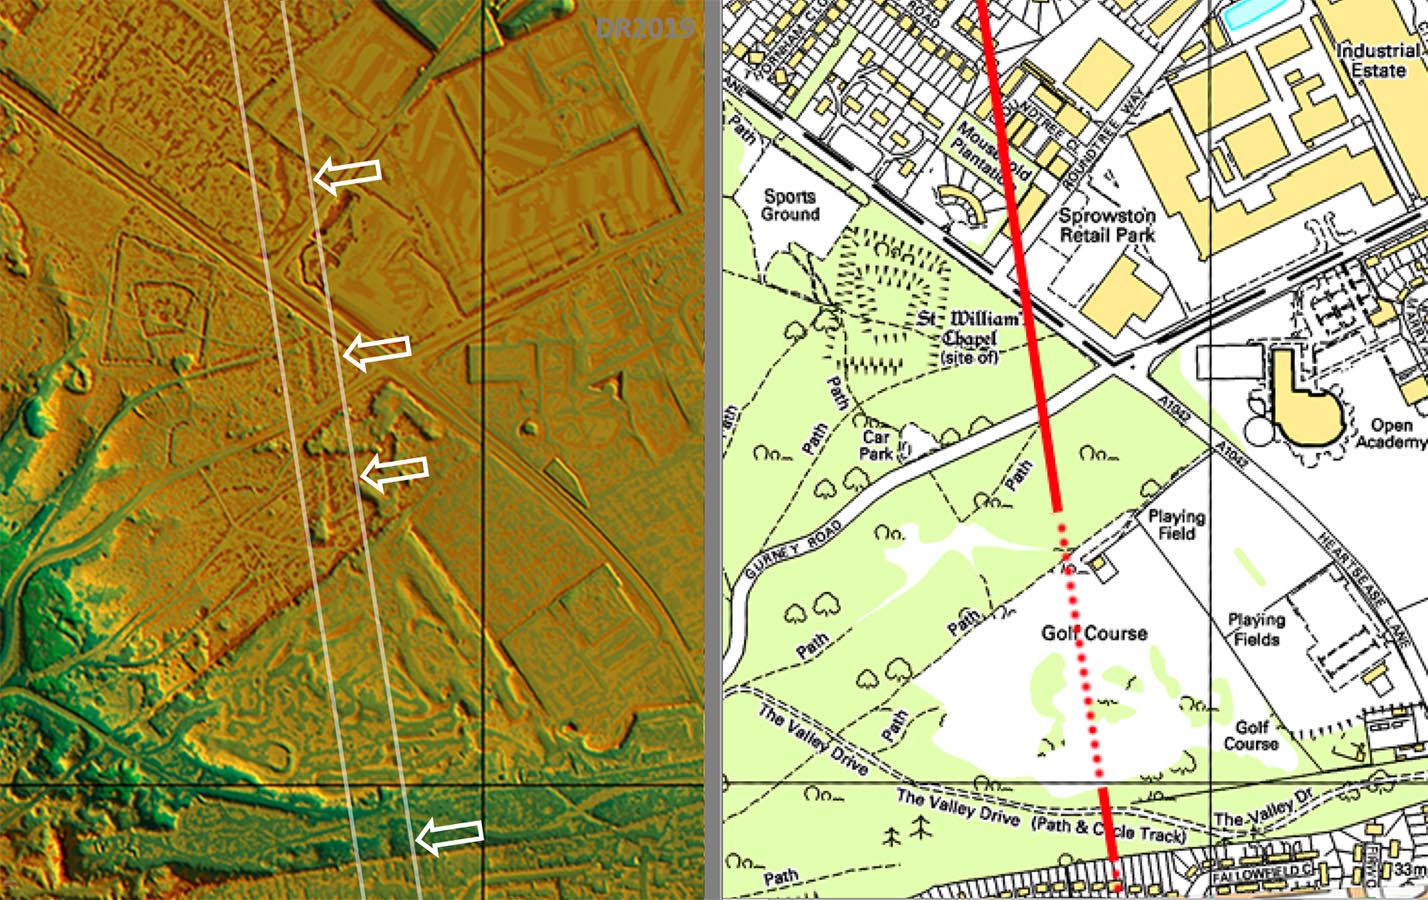
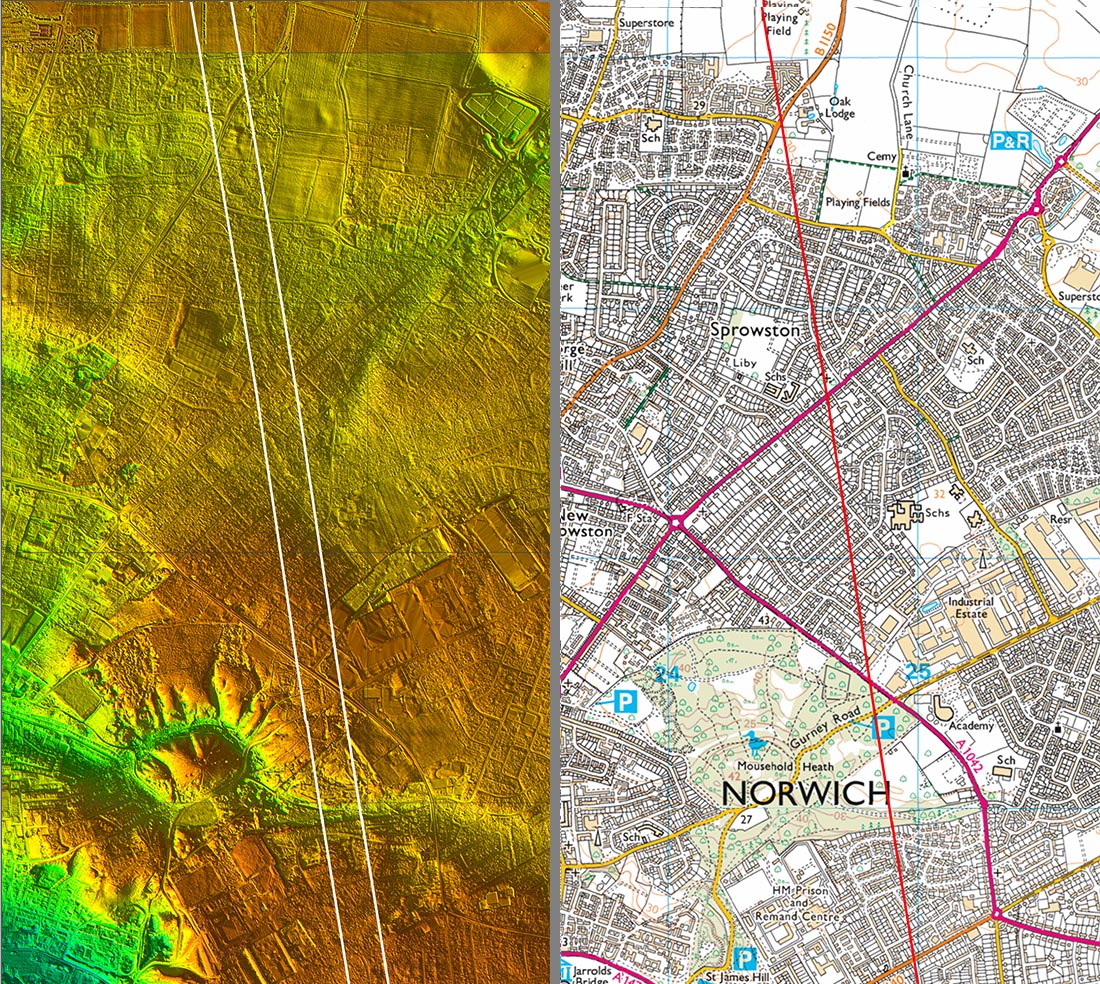
Lidar Image and Map - Mousehold My course would take the road across Mousehold Heath, a large open woodland/heathland area north-east of the city centre. This would be best chance to find the road but, and it was a very big but, Mousehold had been subject to intensive disturbance in the past. It was exploited by the locals to extract all manner of materials and today it is littered with old sand, brick clay and gravel pits. Many of the red bricks of Norwich were made from the red clay from Mousehold. If that wasn’t bad enough it was also used (abused?) as a military training ground, a race course, a United States Army Air Forces base, an aerodrome and a prisoner-of-war camp. But miraculously the road had survived all that! I couldn’t believe my luck when I saw the LiDAR data for Mousehold Heath. There were at least 4 excellent surviving lengths of agger. Possibly the best in Mousehold Plantation but I never discovered how to access it. I have played that golf course several times but had never noticed the Roman road. The road appears to have survived to the left of the 6th hole on the other side of Valley Drive. There is no trace across the golf course - this was extensively quarried up to the 1950s.. |
Click for larger view |
 |
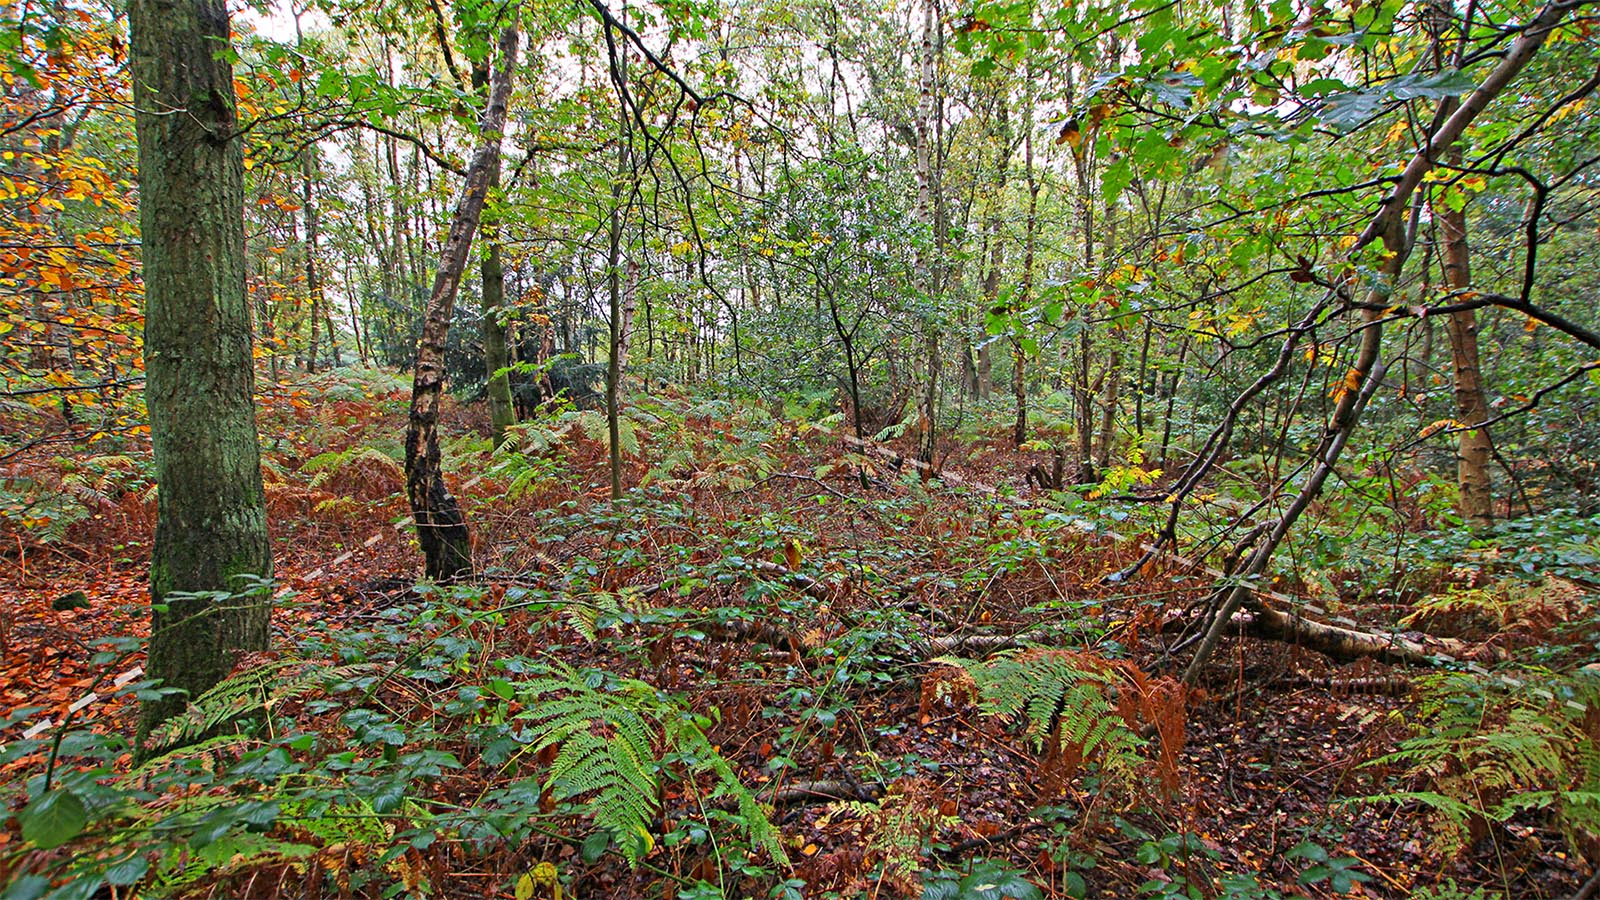
Agger Mousehold Heath - north of Gurney Road I just had to head to Mousehold and look for surviving remains. This is looking north to Mousehold Lane towards the retail park (Homebase). The agger is subtle but definite covered in ivy. If it had been easy to spot it would have been long ago. This perhaps is the best surviving section with access in Mousehold Heath. Image DR |
Click for larger view |
 |
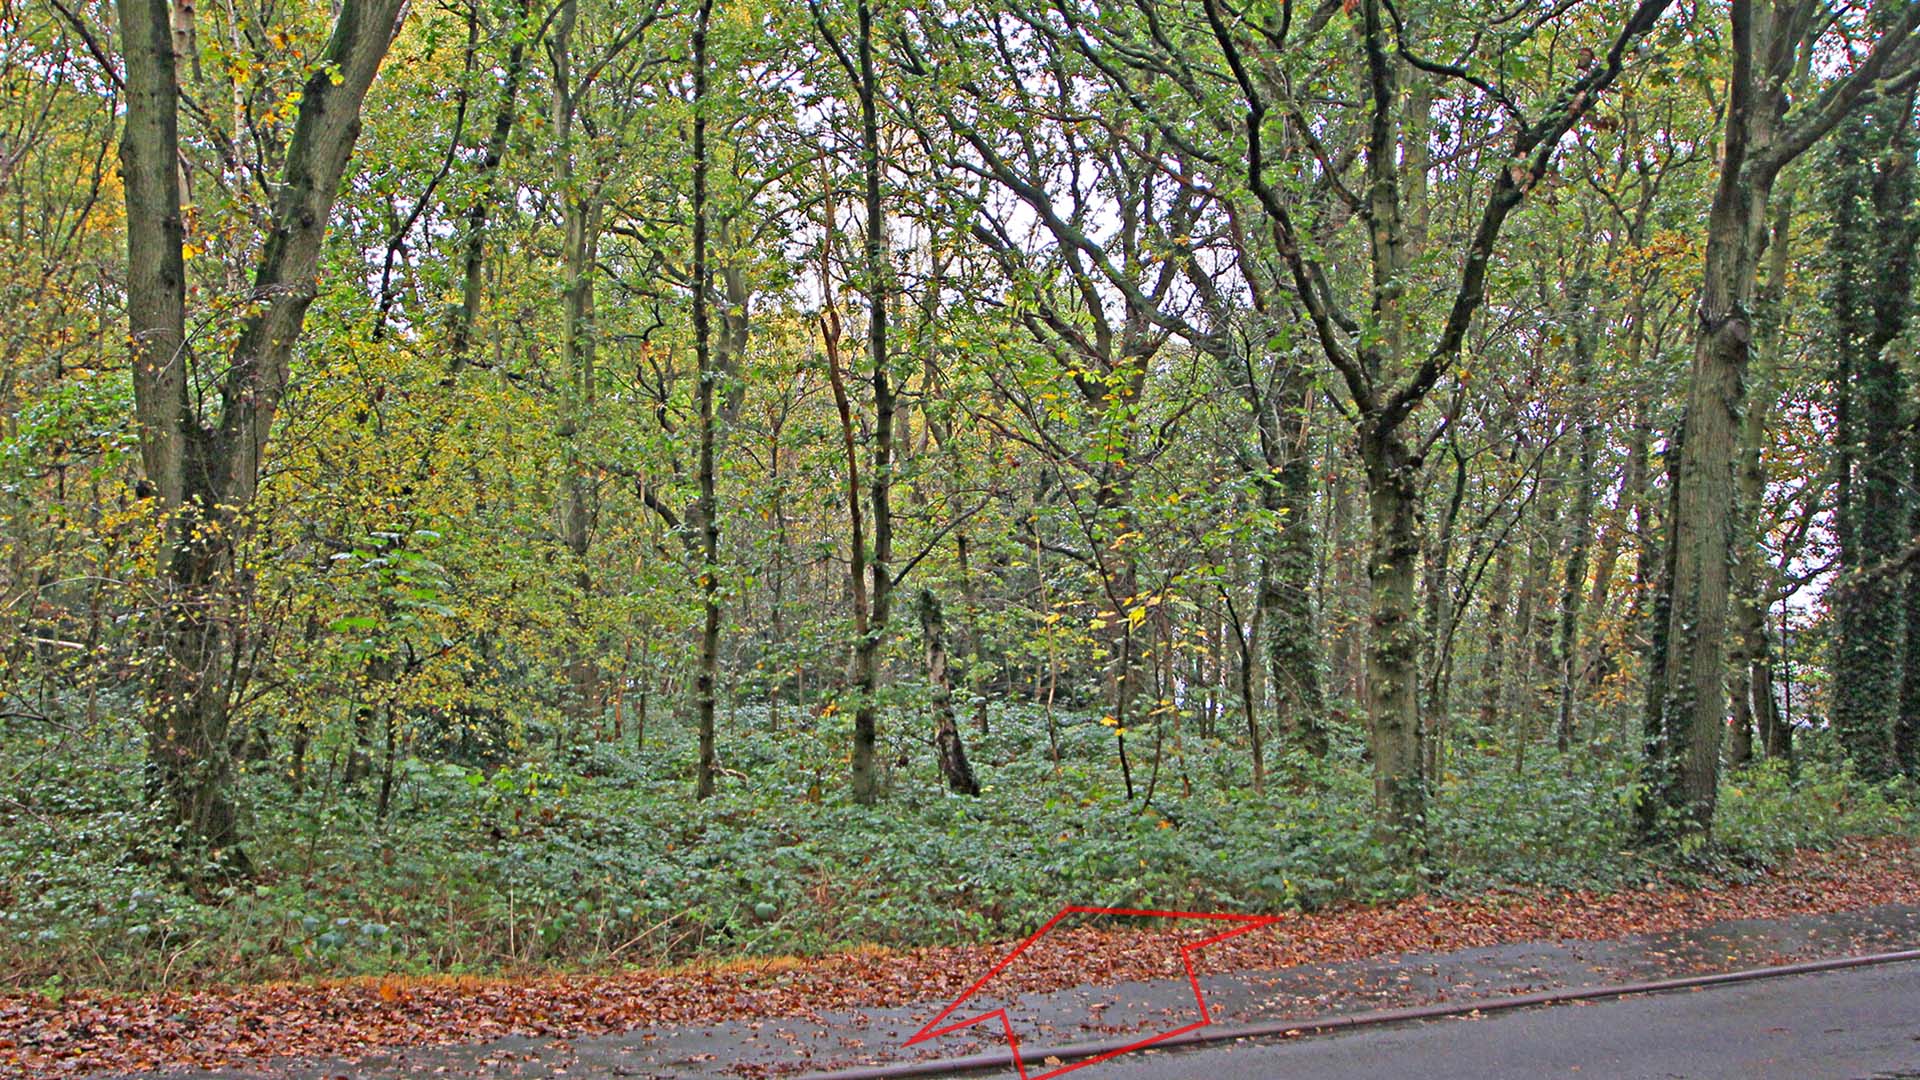
Agger Mousehold Heath - Gurney Road Looking north across Gurney Road. Next time you are stuck at the traffic lights here look left and the swell of the Roman agger is just about discernable. Image DR |
Click for larger view |
 |
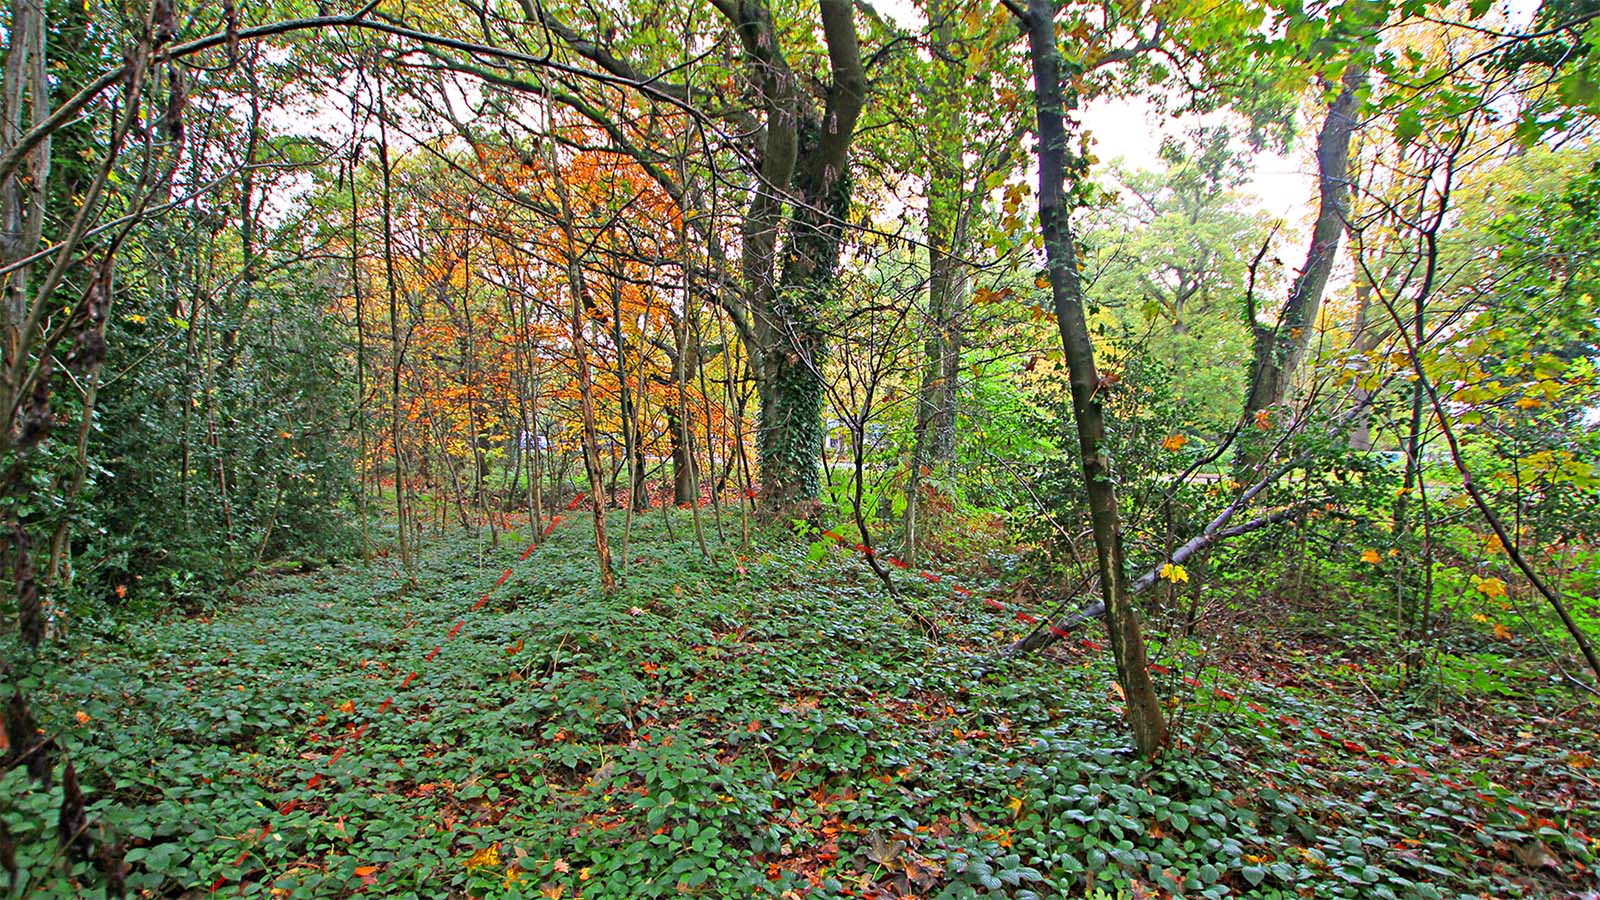
Agger Mousehold Heath - south of Gurney Road 1 We've crossed Gurney road and now are looking down the road agger towards the golf course. There is an old quarry pit behind us that has removed all road traces back to Gurney Road but between here and the golf course the agger and one ditch at least survives. To see this stretch then be prepared to battle with brambles. Image DR |
Click for larger view |
 |
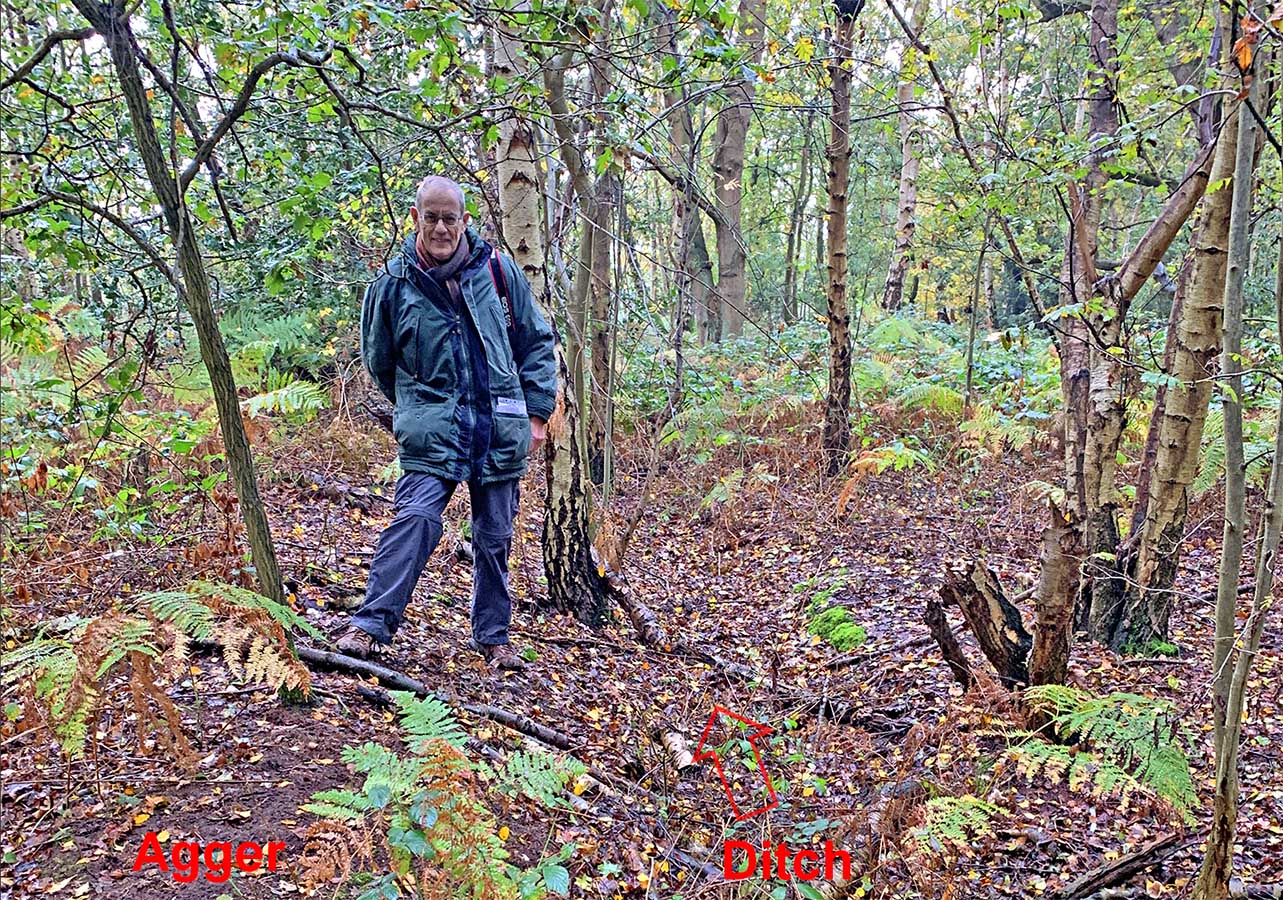
Agger Mousehold Heath - south of Gurney Road 2 Again looking towards the golf course but a closer view of the west side of the agger and the ditch. This does give a bit of a false impression as most of the agger is buried in brambles and to get to this spot is quite a struggle. Image: JR |
Click for larger view |
 |
Valley Drive - Possible Roman Terrace On the south side of the golf course the road had to cross a valley, now containing the aptly named Valley Drive. On the north side of this is a terrace. It does match Roman practice of angling down a slope to reduce the gradient. This would imply a dog-leg here to descend this slope. It is difficult to be certain as the quarrying and then landscaping for the golf course could have altered much here. It is more certain across Valley Drive. Image: DR |
Click for larger view |
 |
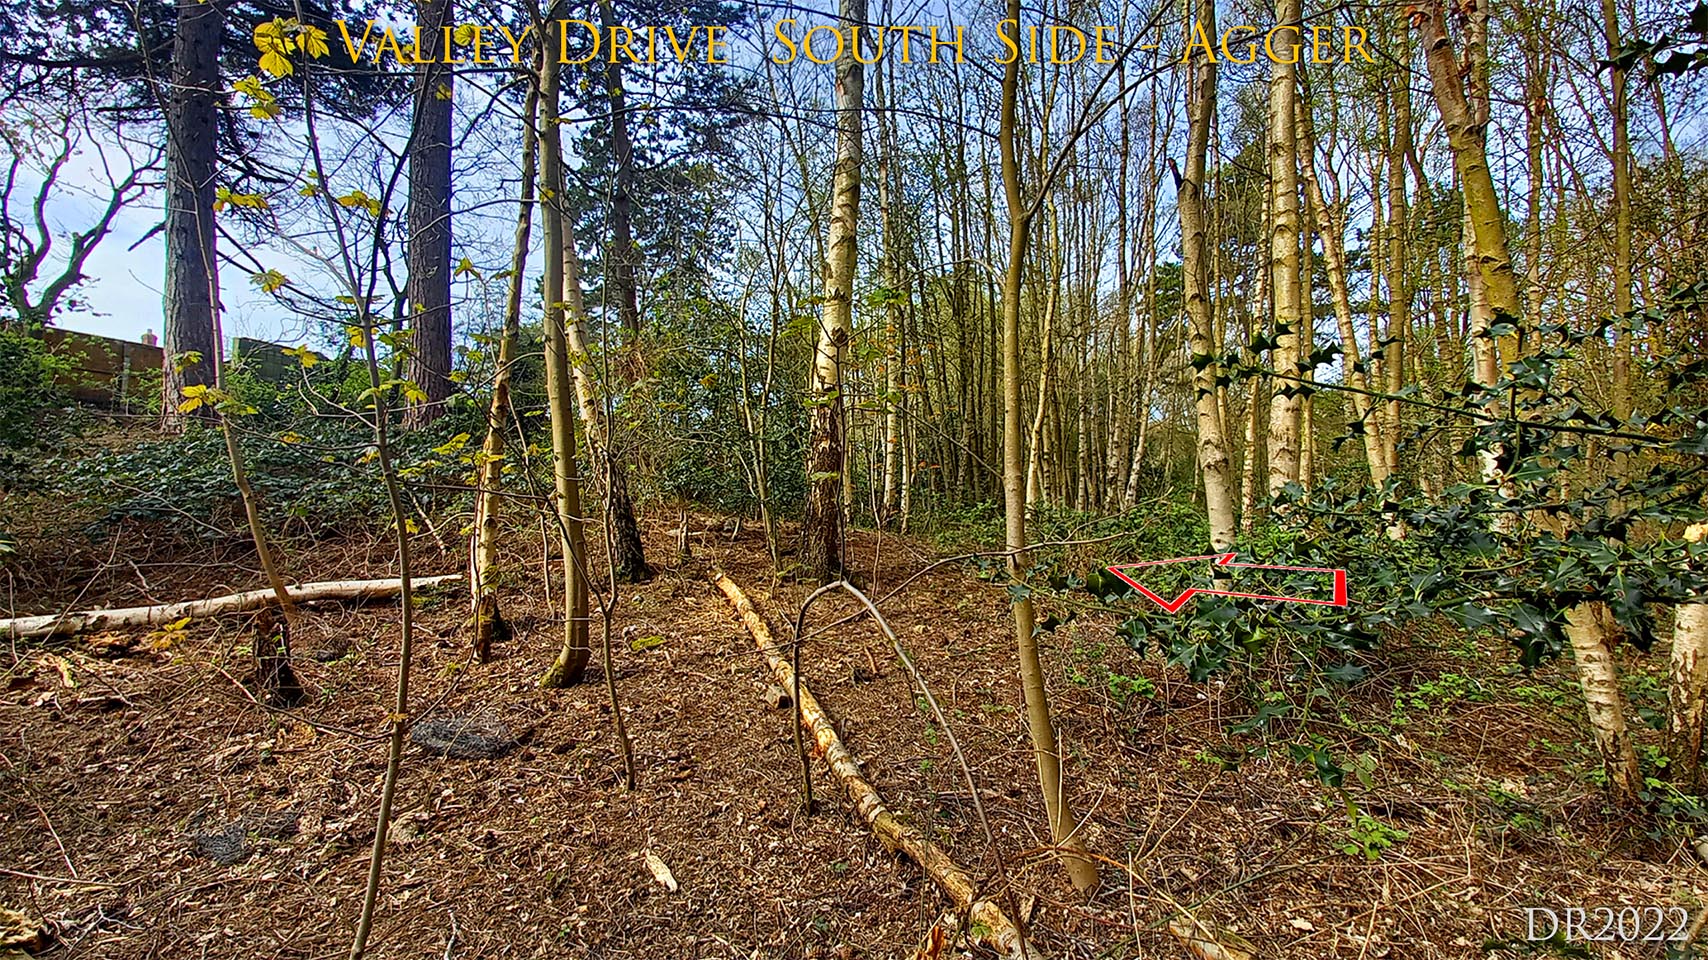
Valley Drive - South Side Agger On the southern side of Valley Drive then the swell of the aggeg heading up out of the valley is very obvious both in Lidar imagery and on the ground. This side of the valley is less steep so no zig-zag was necessary. Image: DR |
Click for larger view |
 |
Lidar Image And Route Map 4 The western side of Mousehold has a very strange geology with that circular raised area surround by dry valleys - presumably glacial metwater streams long gone. However, the Roman alignment was obviously very sensibly chosen to pass clear of this feature on its eastern side. |
Click for larger view |
 |
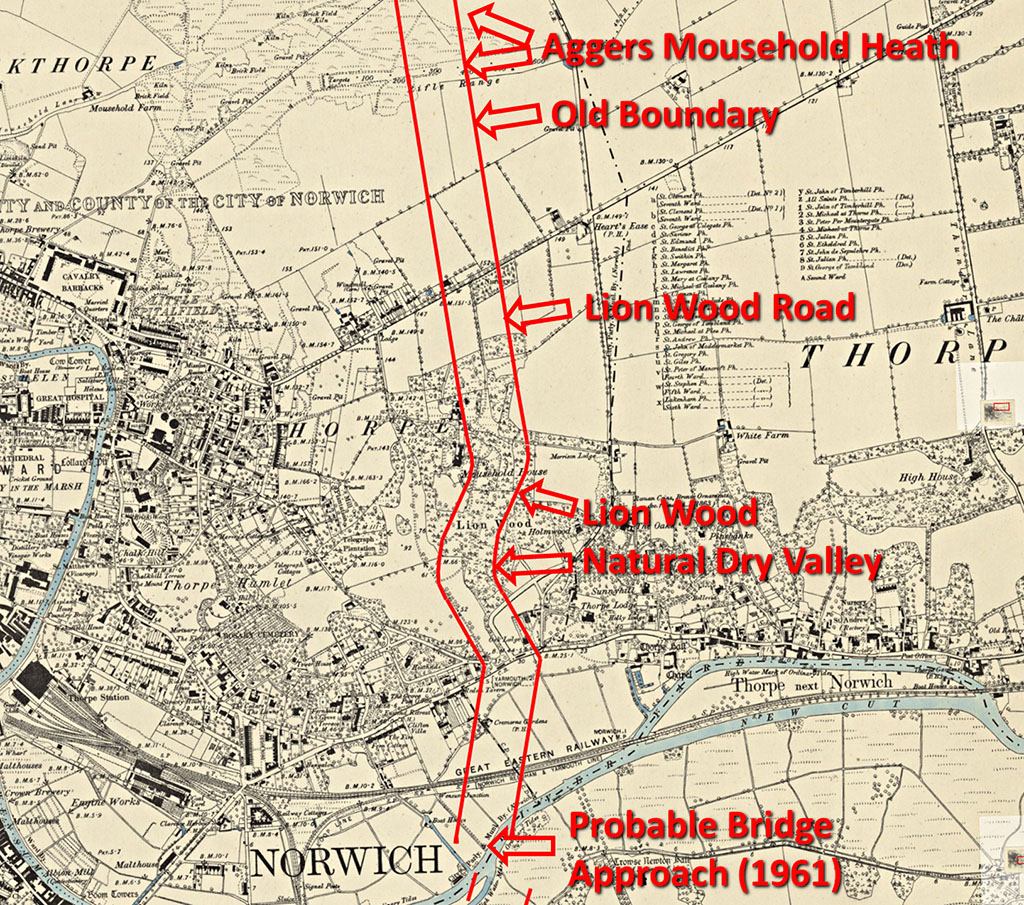
OS First Edition Map c. 1880 South of Mousehold, an old straight boundary on the OS First Edition Map and Lion Wood Road match the Roman line from across Mousehold exactly. It certainly is heading for that valley in Lion Wood. |
Click for larger view |
 |
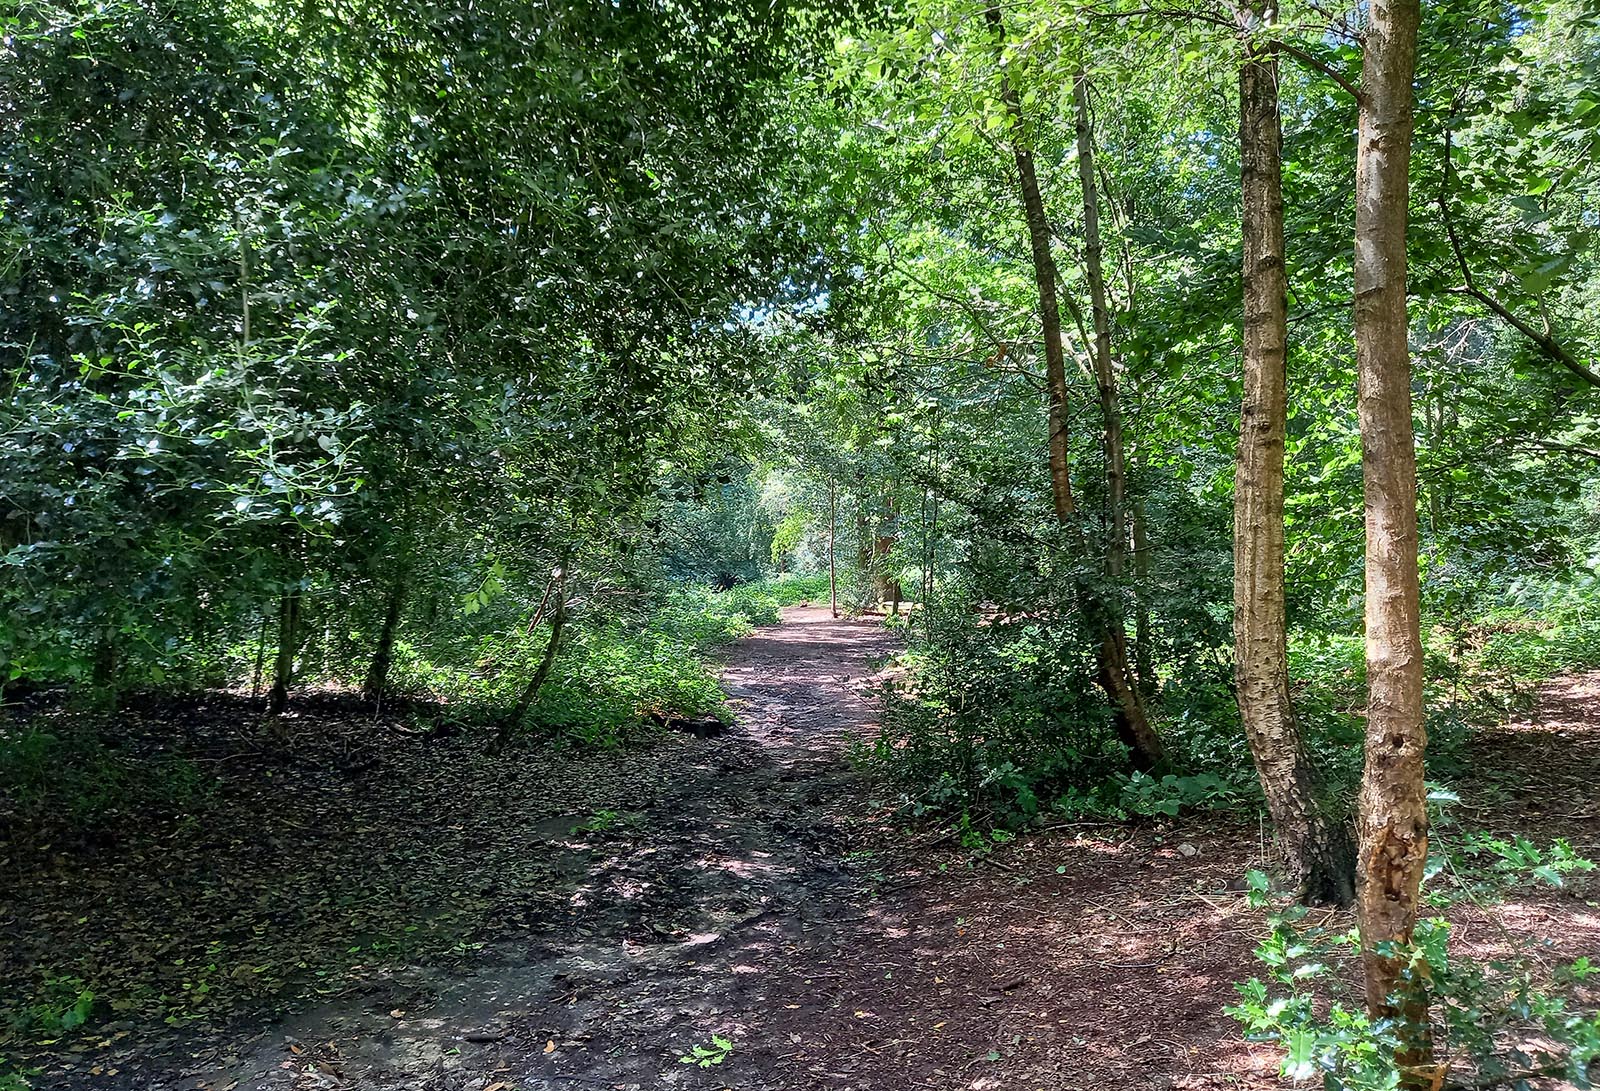
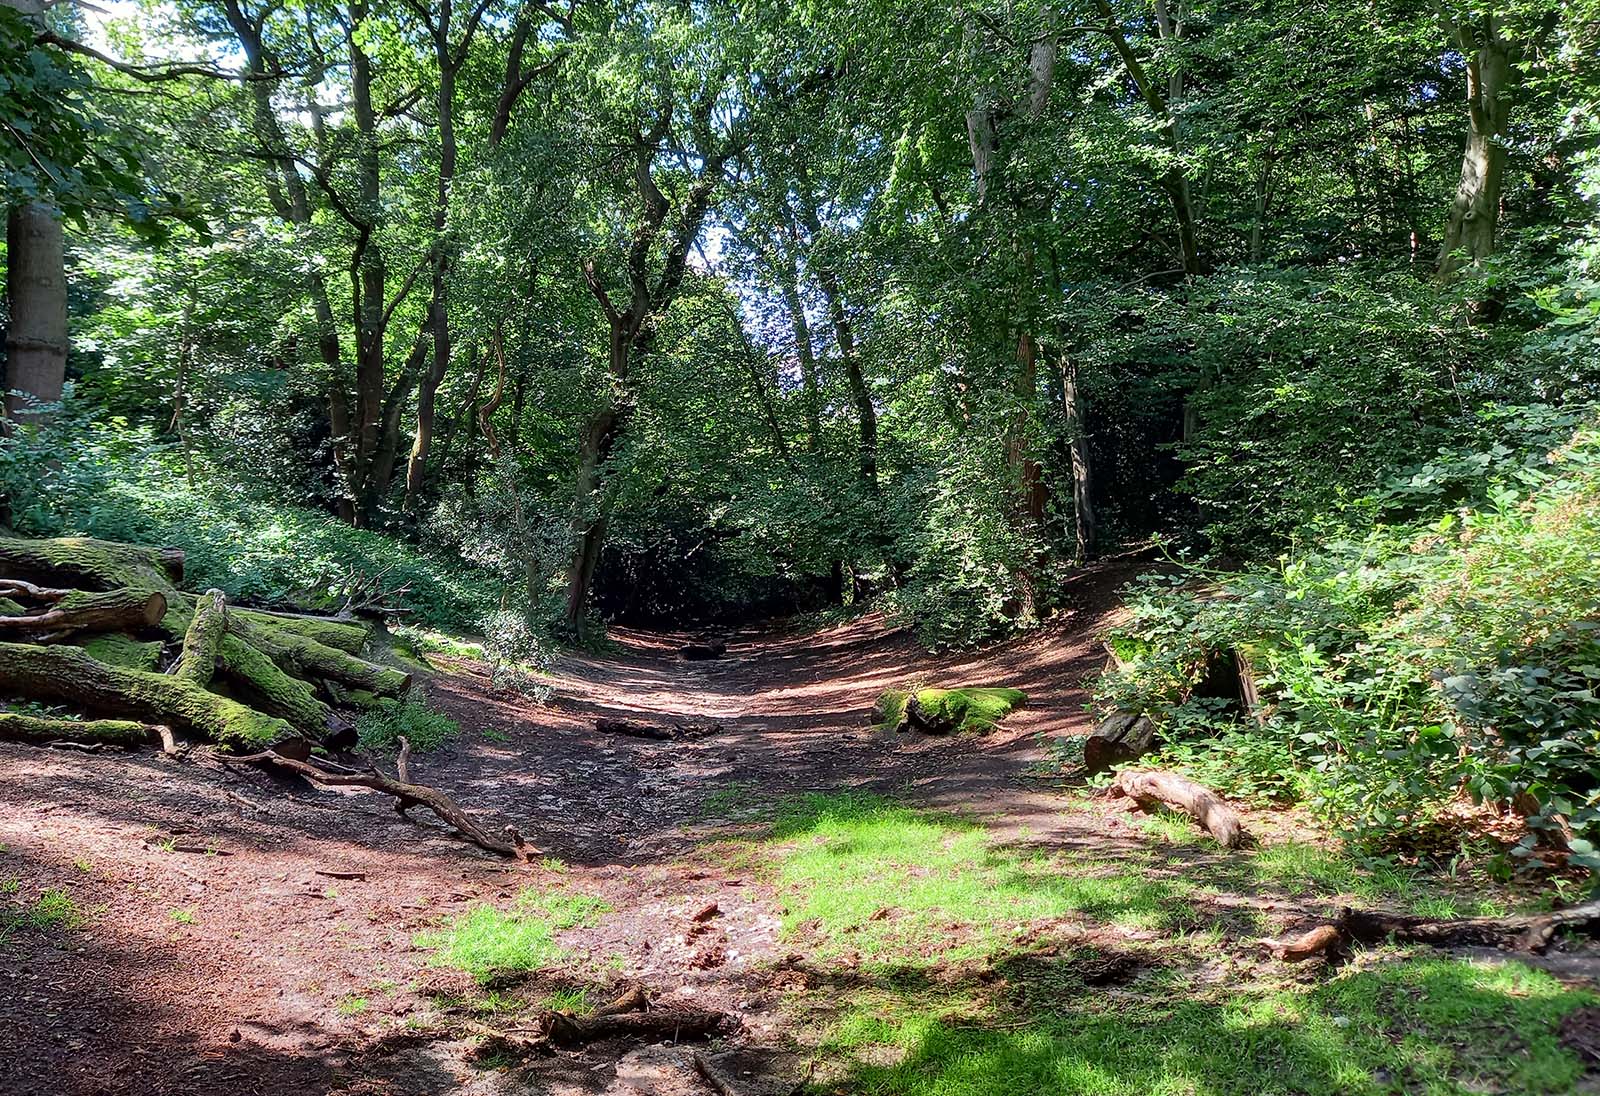
Lion Wood 1 The road targetted the easterly of 2 dry valleys in Lion Wood. This provided an easy gradual descent down to the River Yare. We are looking south down the line of the road. Wash down over the centuries has obscured the agger in most places but walking the route shows how easy a descent it was and a logical location for the road.. Image: DR |
Click for larger view |
 |
Lion Wood 2 We are at the southern end of Lion Woods and the route is blocked ahead by a boundary. There is a short surviving agger here, mostly behind the camera, but in this view the last visible trace of the agger is where the short green grass is visible, just before it fades out. Image: DR |
Click for larger view |
 |
Oblique 3D Lidar View (DTM) - looking north from The River Yare We are looking north in this 3D LiDAR view from the River Yare. The natural valley that the Romans targeted for their descent to the river shows what superb local knowledge and surveying skills they possessed. The alignment of this road was excellently chosen. If they had moved the road to the west – in theory providing a shorter route to Caistor - then they would have had to descend and ascend several valleys of Mousehold Heath. They sensibly skirted around them instead. At the bottom of the Lion Wood descent, on the north bank of the Yare, was found in 1961 what was described as a possible bridge approach (Norfolk HER 514). Wow - it couldn’t have fitted together any better. |
Click for larger view |
 |
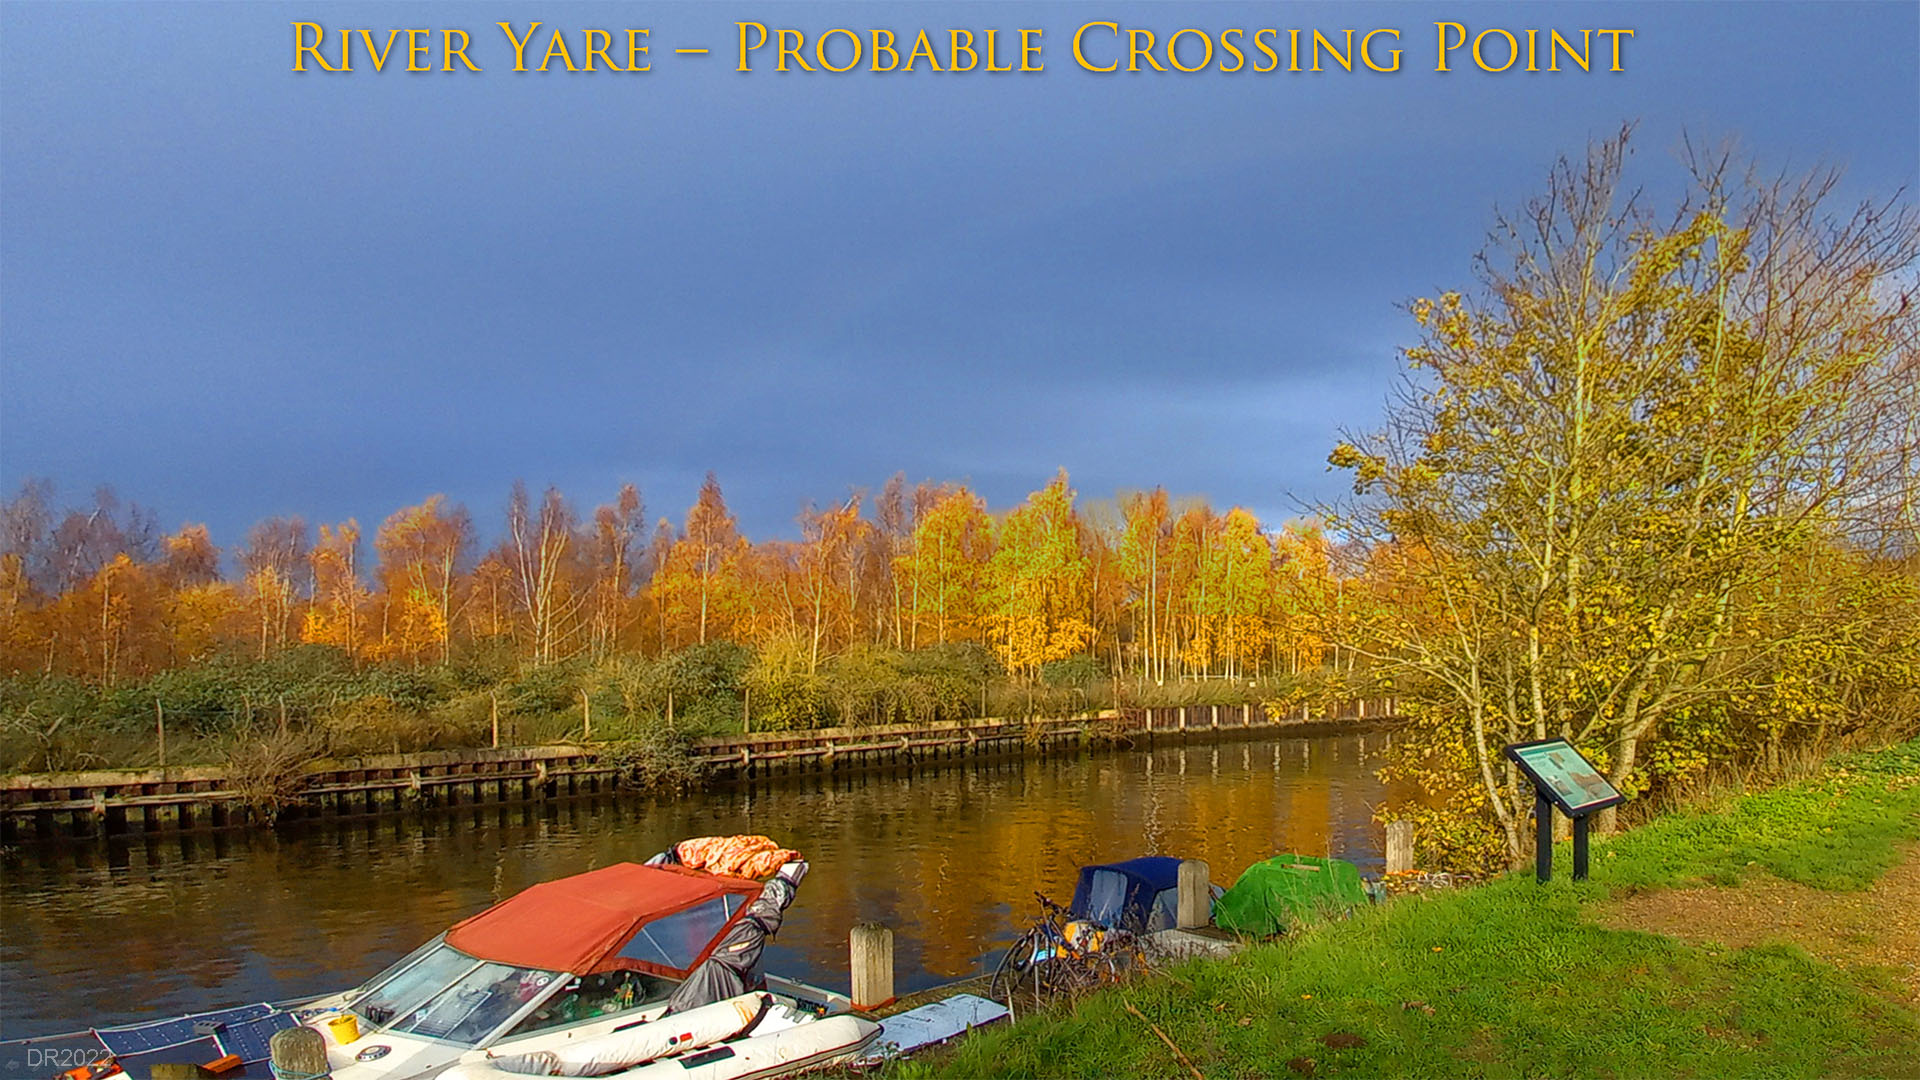
River Yare - Crossing Point This is the spot on the far bank where the remains of a Roman bridge or wharf was found. At that time the Roman road was thought to be around 1 mile further east. This was presumably why the interpretation was uncertain. With the route of the road now determined I think we can reasonably confident it was a bridge that was discovered. This spot is in Whitlingham Country Park just behind the waterpsorts complex and downstream of the Wensum and Yare confluence. This is a logical bridging point - although downstream of the confluence means a bigger river to cross only one bridge would be required. A very sensible position. Image: DR |
Click for larger view |
 |
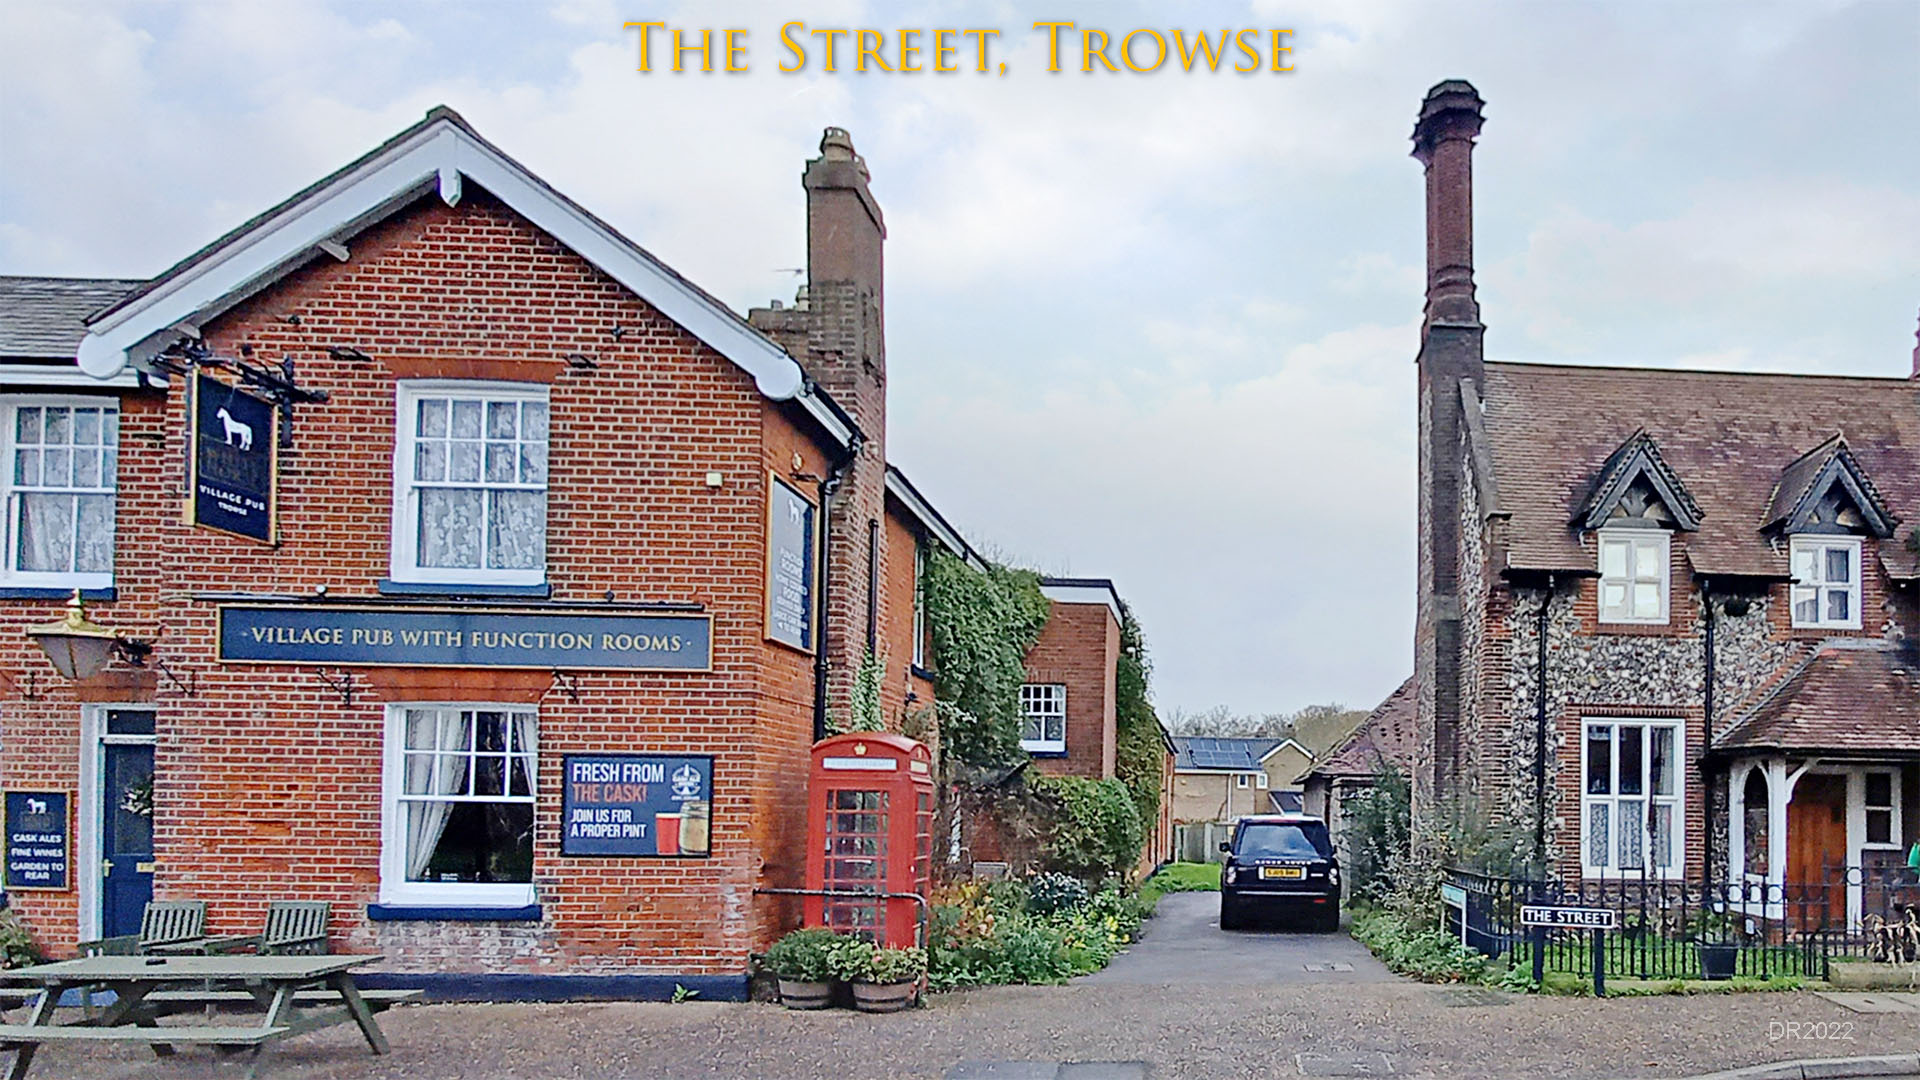
The Street, Trowse First things first - The Street is not the Roman road! We are looking back to Whitlingham Park here and the Roman road is marked by the narrow alleyway where the car is parked. |
Click for larger view |
 |
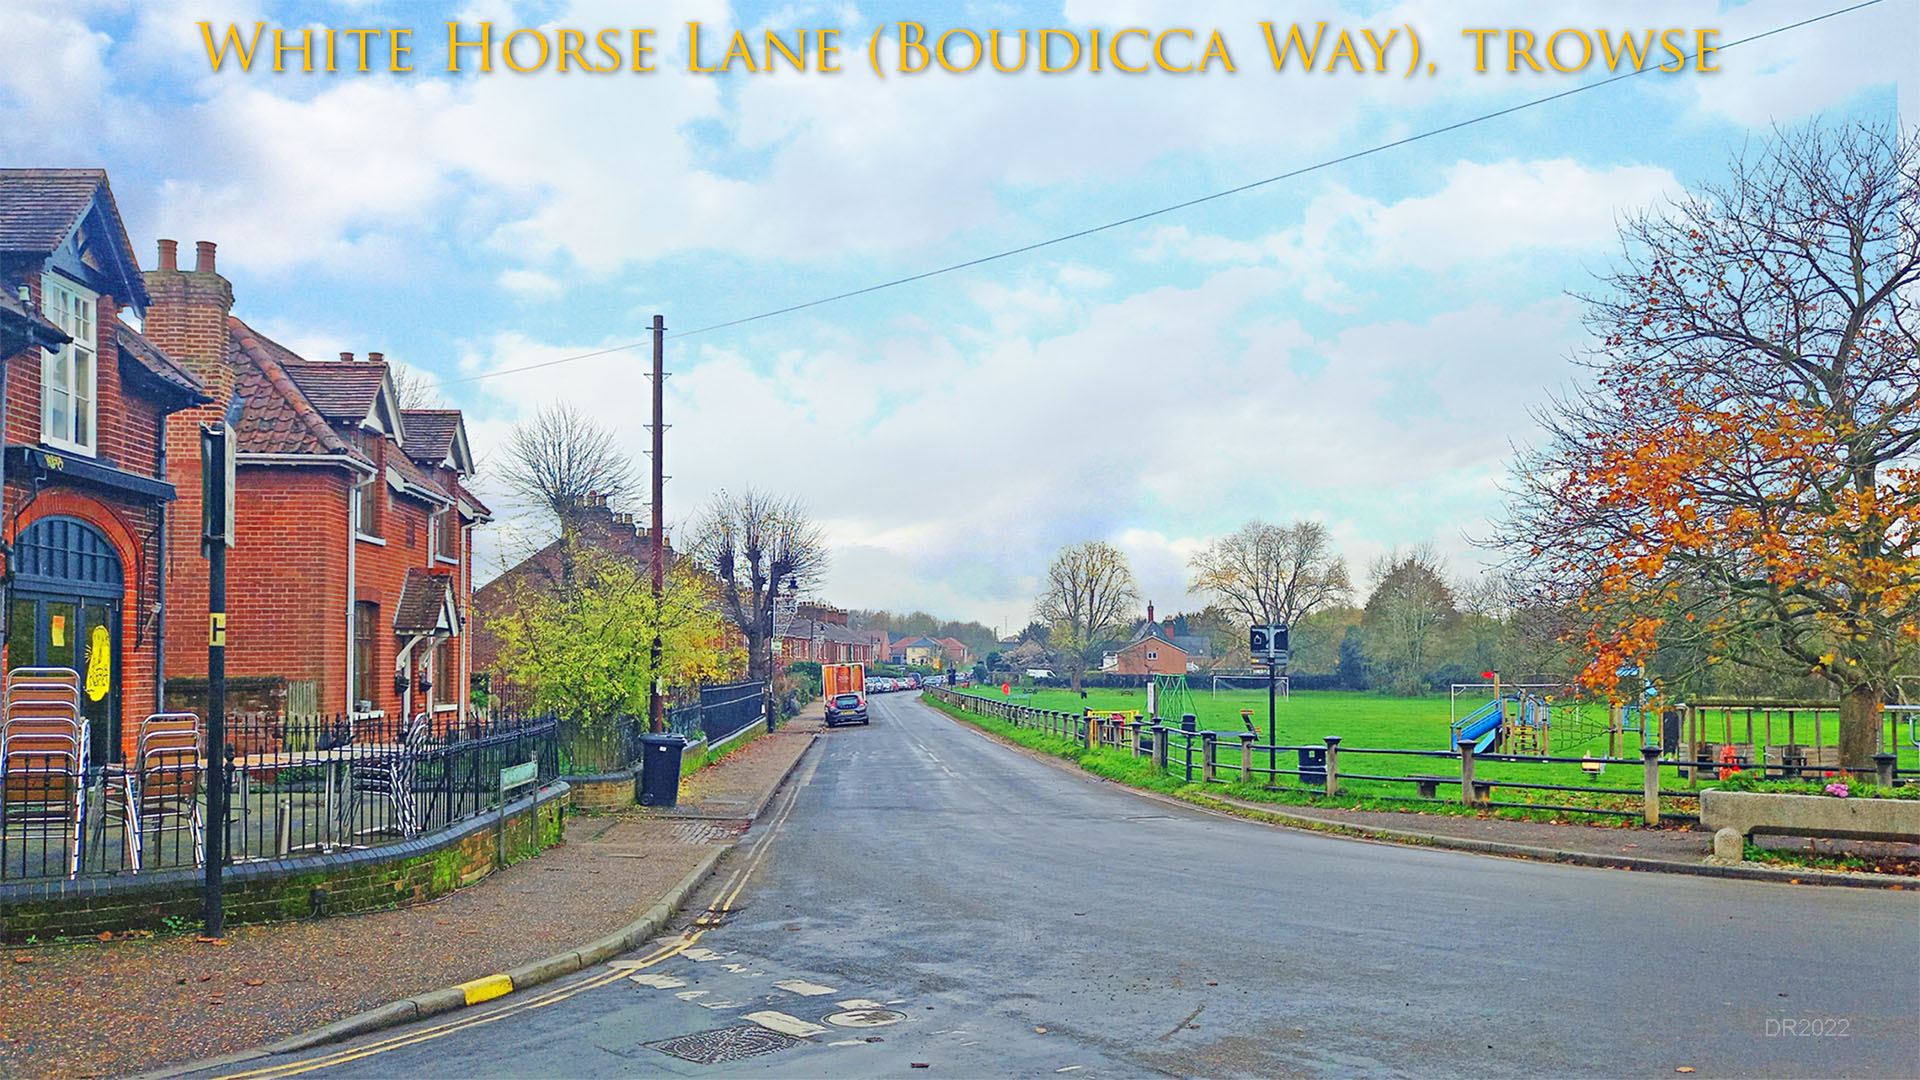
White Horse Lane, Trowse We have turned through 180 degrees to the above view and are now looking down White Horse Lane towards Caistor. White Horse Lane is part of Boudicca Way long distance trail although the creators of this route almost certainly did not realise this section was a Roman road. |
Click for larger view |
 |
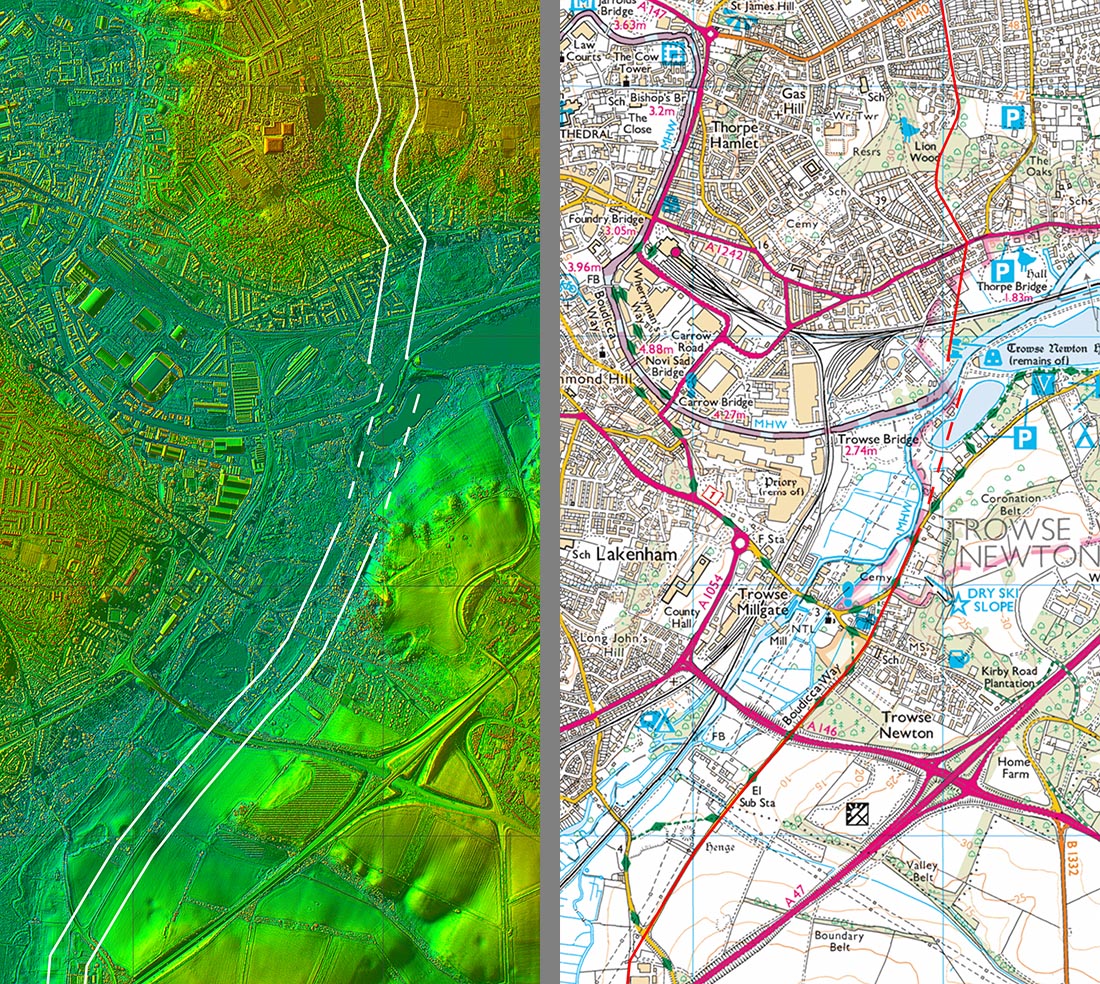
Lidar Image - River Yare and Caistor From the River Yare crossing to Caistor then the route is somewhat speculative but probably followed the straight modern road, appropriately part of Boudicca Way. This Lidar view also shows how Caistor was connected to the River system. they didn't just use roads! |
Click for larger view |
 |
Lidar Image And Route Map 5 I wonder when Boudicca Way was being devised if they realised it really was a Roman road? |
Click for larger view |
 |
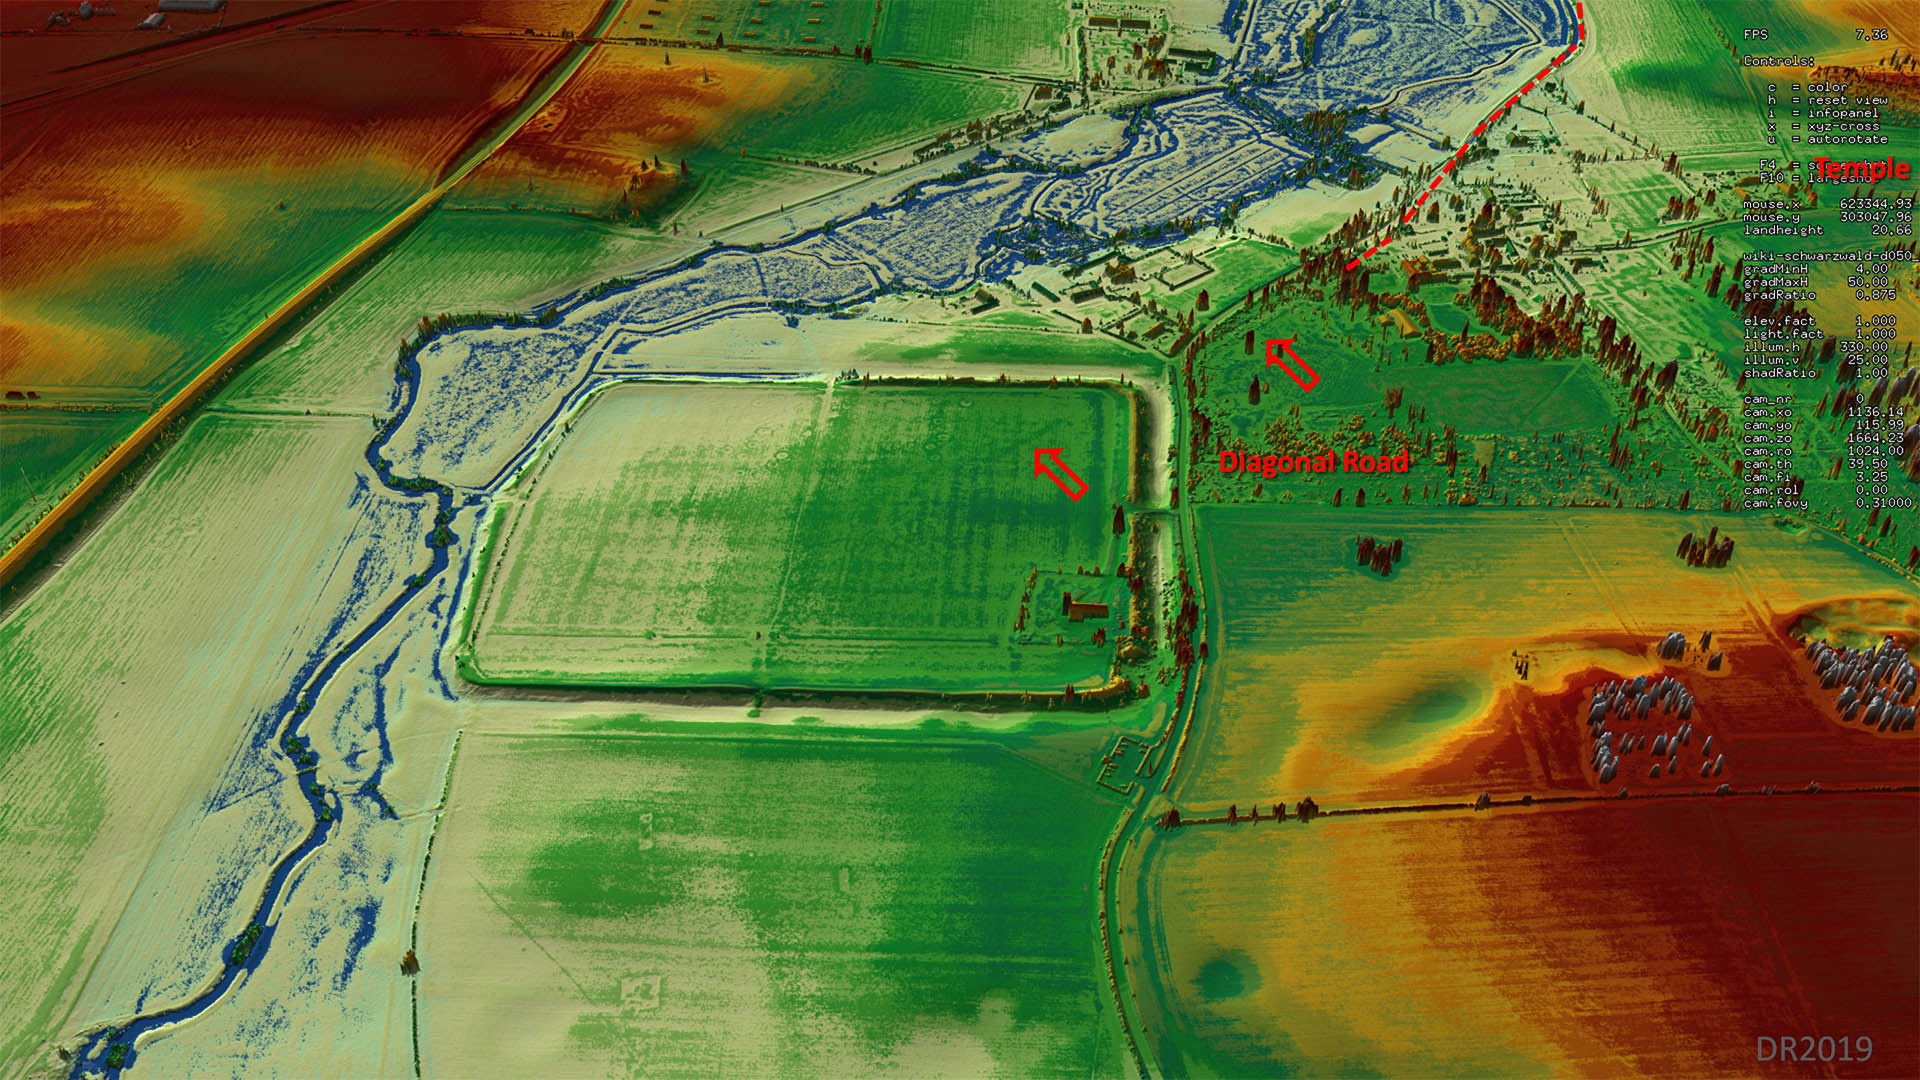
Oblique 3D Lidar View - Caistor St Edmund At the Caistor site, and predating the city walls, is a diagonal road heading north-east. This is pointing towards Boudicca Way and our River Yare crossing so can only have been our road. |
Click for larger view |
 |
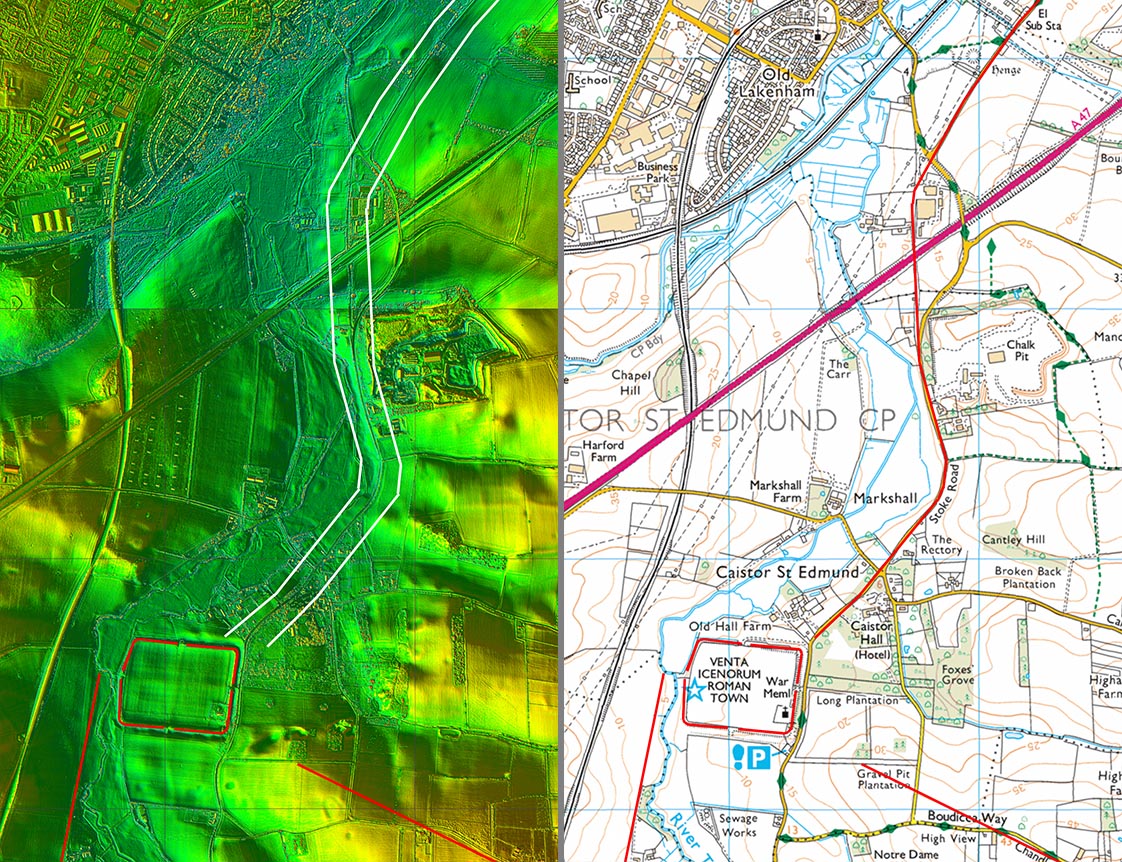
Lidar Image And Route Map 6 The road arrives at the north-east corner of the city walls but the Roman route would have been set-out before the walls were built so I guess a new piece of road would have been needed to reach either the north or more likely the east gate. |
Click for larger view |
 |
NEW - 3D Lidar video flyover along the road - there has been a virtual reality snowfall in Norfolk!
|
|
|
|
Last update: November 2022 |
© David Ratledge |